Inspection is one of the fundamental steps in the maintenance of a weapon. This aspect, which is largely ignored by a large part of users, is nevertheless of the utmost importance. While some inspection operations can only be carried out by trained personnel, a large part of it can be carried out by the user. It is based on the observation and knowledge of one’s weapon. And knowledge will come by dint of observation!
The inspection must be carried out on each part of the weapon cleaned and free of lubricant. Indeed, if the presence of dirt can mask or distort the inspection, the presence of lubricants can distort the vision of a defect, including surface finishes.
During an inspection, you will be looking for 3 alterations:
- WEAR: we look for traces of wear related to normal use of the weapon. These traces of wear are usually formed by deformations, tears, and cracks. If the surface bleached by friction are indeed traces of wear, they are to be relativized in terms of importance.
- ANOMALY: we look for alterations of the weapon that are related to an abnormal interaction of the weapon with its environment: fall, exposure to high temperatures, poor maintenance treatment …
- OXIDATION: we look for traces of metal alteration related to corrosion. Although oxidation is part of the anomalies, we will give it a special place because of its recurrence and its effects.
When in doubt on one of these points and the consequences of the alteration discovered: do not hesitate to consult a professional. Prevention is better than cure.
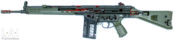
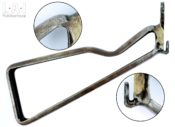
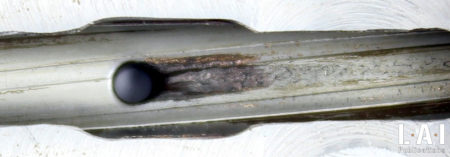
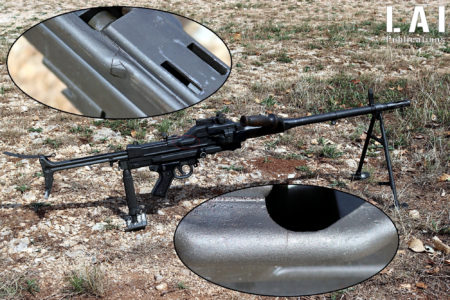
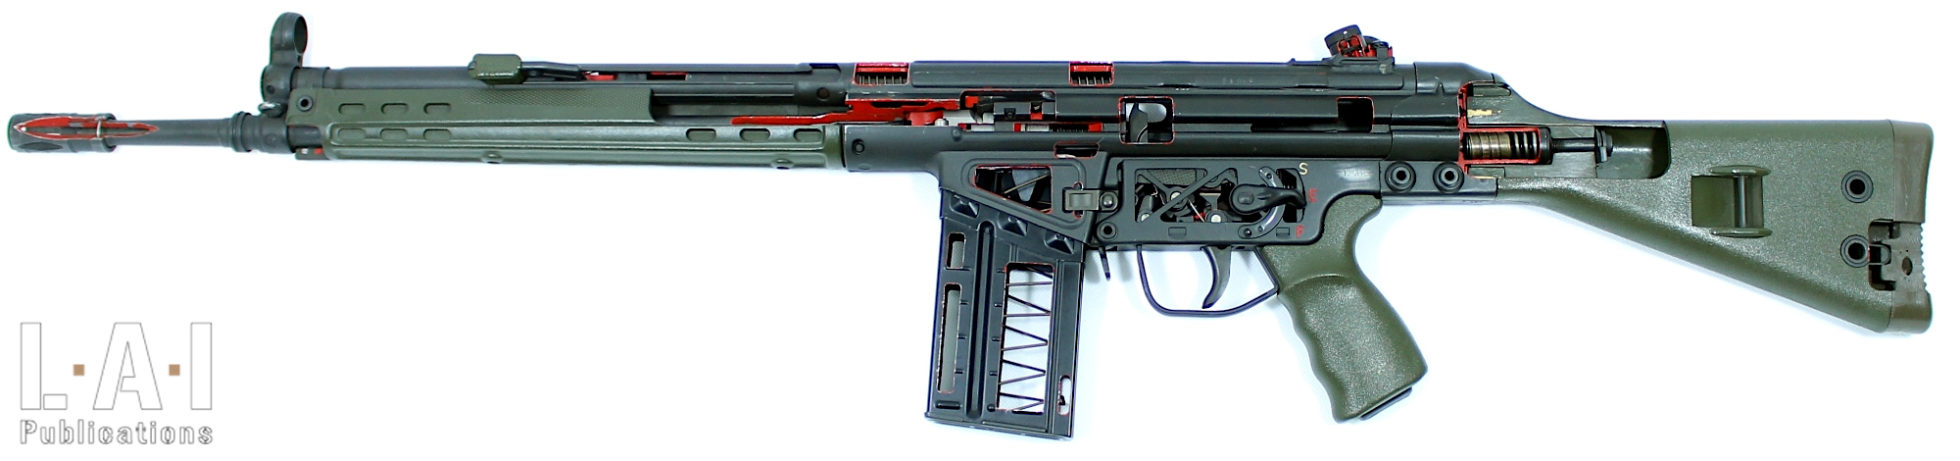
It is also necessary to understand here, that like most manufactured products, a weapon has a lifespan. This will generally be expressed in the number of shots fired. It can vary from one weapon to another, and sometimes even within the same range, depending on the prerequisites of a customer, from one model to another. For example, G3 rifles produced for the Norwegian army have a lifespan twice as long as those produced for the German army. Here, the service life has been conferred by the improvement of the bolt carrier group buffer. (Pic.01)
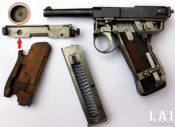
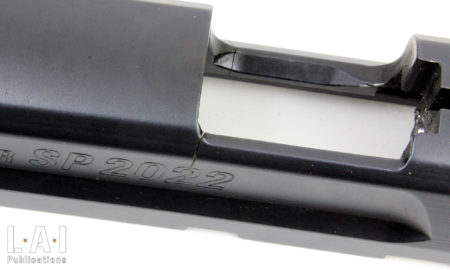
The service life is also related to the nature of the ammunition used as well as the maintenance applied. Thus, it is not aberrant to keep an account of the number of shots fired. Finally, like a vehicle, the life of a weapon can be punctuated by maintenance operations. These maintenance operations can be scheduled. For example, on a SIG SAUER SP 2022 pistol, the replacement of the recoil spring is recommended every 5000 shots by the manufacturer. (Pic.02)
In order to accompany the reader in his inspection, we will detail here materials and control points for each notable part of the weapon, with and without tools.
I. The Material
Inspection may require different materials. We will present several of them here and in particular some checking gauges.
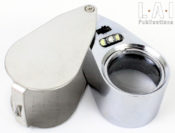
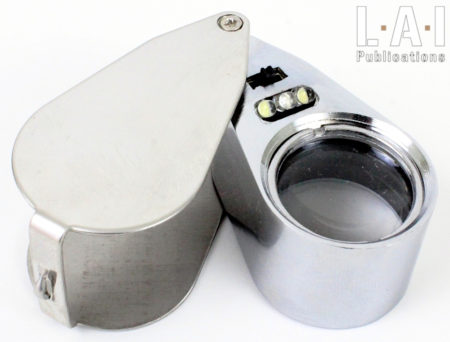
- Magnifying glasses: they allow the observation in detail and in particular to look out for cracks. They can be of different forms. We will note two particularly worthy of interest: the watchmaker’s magnifying glass and the standing magnifying glass. (Pics.03 and 04).
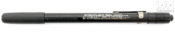
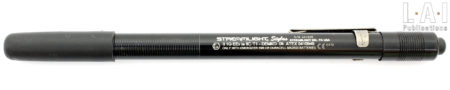
- Inspection lamps and other illumination devices: many different types exist; their purpose is to provide a diffuse and homogeneous beam of light and whose intensity is adjustable if possible. Too intense illumination can distort observations. (Pics.05 to 07)
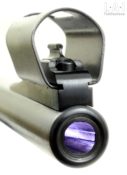
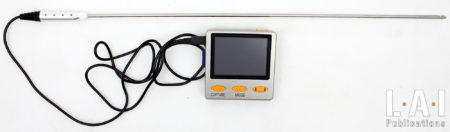
- The borescope: this is an optical or optronic device that allows you to visualize the inside of the barrel. It is very convenient to assess the precise condition of the barrel (rifling, throat, wear of gas port, etc.). We will come back to its use later. It should be noted here that the use of a borescope always highlights imperfections within the barrel. The only significant deteriorations are those that induce a failure or a degradation of performance (accuracy and reliability). Also, it is necessary to stay reasonable and remain pragmatic on the observations made by always concluding with this question “is the gun safe to use and conforms to the needs of its mission (precision and reliability)? ». If the answer is yes, do not take to heart the other minor alterations observed. Finally, it should be noted that there are borescopes that allow different angles of view: those that interest us mainly here are those that carry out an inspection perpendicular to the axis of the barrel. (Pic.08)
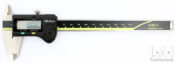
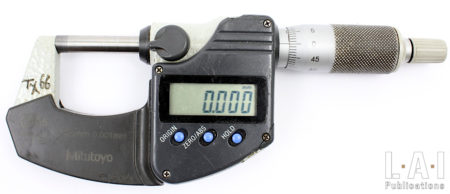
- Metrology instruments: of various shapes (caliper, palmer …) they are useful for collecting and comparing dimensional information. Pay attention to the condition and calibration of these tools! Regarding the interpretation made of these measurements, they must either be heavily documented (manufacturer’s documentation) or be heavily compared! (Pics.09 and 10)
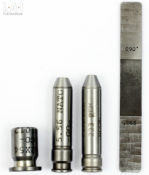
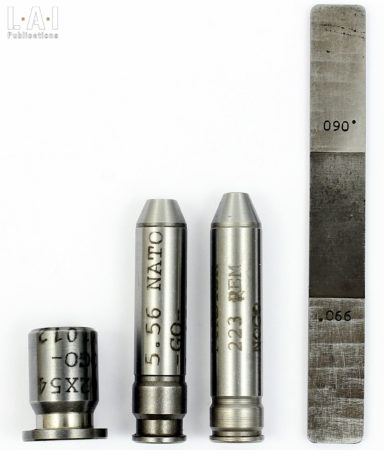
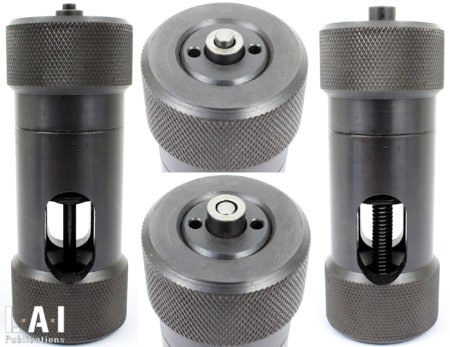
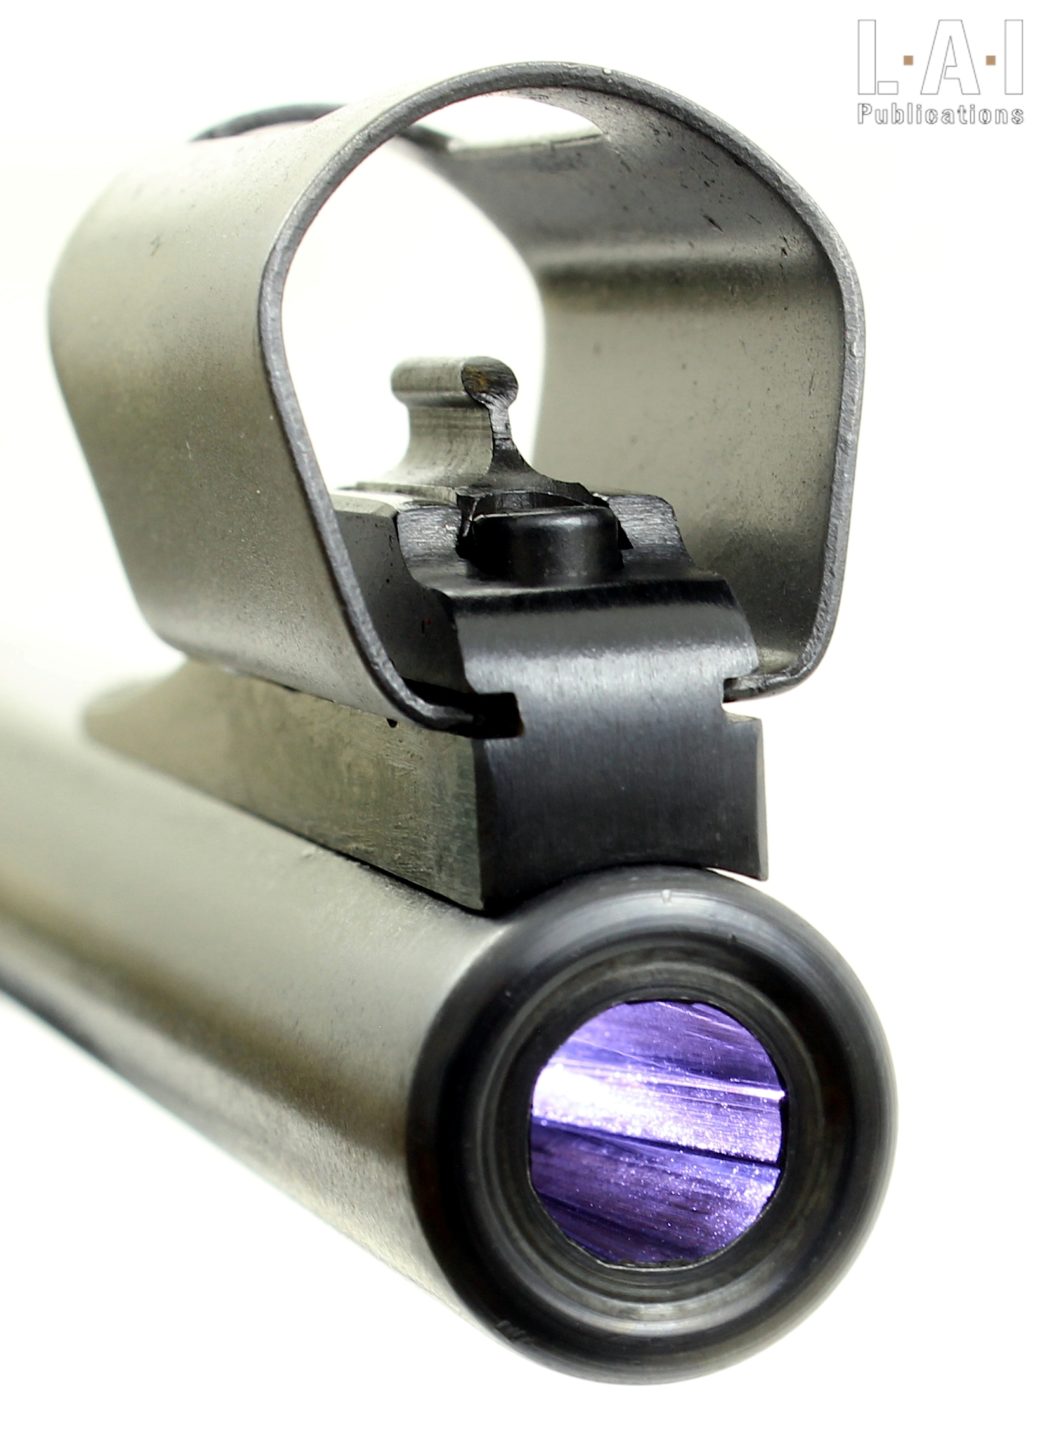
- HeadspaceDistance between the rear support surface of the ammunition ... More gauges: in a firearm, headspaceDistance between the rear support surface of the ammunition ... More is the distance which, when the breech mechanism are in forward positions, separates the front support surface of the ammunition (in the chamber) from the rear support surface of the ammunition (on the breech, bolt, or frame). HeadspaceDistance between the rear support surface of the ammunition ... More gauges allow to check these distances and establish low and high limits (often referred to as “go” or “no-go”). Be careful, these distances are established according to a given standard, and as we have seen, there are several standards. A CIP standard gauge will be different from a SAAMI standard gauge which will be different from a NATO gauge. In fact, it is necessary as for any metrological comparison to refer to the manufacturer’s indications for the weapon variant under inspection. (Pic.11)
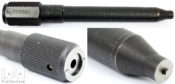
- Bore diameter gauges: they make it possible to evaluate the diameter of the barrel between opposing lands. Here too, as for the headspaceDistance between the rear support surface of the ammunition ... More gauge it is necessary to refer to the manufacturer’s standards. Also, these gauges are not excellent advisors: they only evaluate the diameter between opposing lands and do not qualify in this way either the accuracy or the general condition of the barrel! A visual examination, potentially assisted by a borescope and especially the firing (if the barrel is suitable from a safety point of view) is the best advisor in this matter. The real use of this type of gauge is to record the wear of a gun whose standards and history are known (i.e., the number of shots fired, and the diameters measured at previous stages). Finally, for the operation of automatic rearmament weapons, the barrel diameter between opposing lands is not as important as that between opposing grooves… (Pic.12)
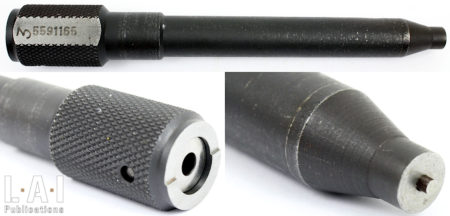
- Other gauges: there is quite a lot of them! Control of the spacing under extractor, spacing of the lips of the magazine, protrusions of the firing pin, withdrawal of the firing pin, etc. These gauges are normally dedicated to a single weapon variant and are usually intended for an audience of professionals trained for their uses. While this is certainly not likely to limit the public who use them, it is important to keep this in consideration so as not to misunderstand the interpretations that can be made. (Pics.13 to 15)
I. Parts to inspect
I-a). Barrel
The barrel is the first part to be checked.
A visit mirror, inspection lamp, fiber optics or borescope may be used. The first three devices are intended to introduce light into the barrel. It is advisable to be wary of devices introducing too much light into the barrel as it distorts the perception of defects (Pic.16).
Here is a non-exhaustive list of points to check:
- Absence of traces of oxidation: the presence of oxidation in the chamber is particularly problematic. It interferes with the extraction of the spent case and can be the cause of malfunction, especially in self-loading weapons. The presence of light oxidations on the other parts of the barrel (including in the bore) can be tolerated as it does not alter the proper functioning of the weapon (including accuracy). Indeed, oxidation in the bore of the barrel can accentuate the gas leak around the bullet and thus adversely modify the internal ballistics of the barrel and the operation of the weapon (Pic.17).
- Absence of traces of deterioration (shock or ovalization): especially on the muzzle and on the rear face of the barrel. As already mentioned, a deterioration of the muzzle can have serious consequences in terms of accuracy. Damage to the rear face of the barrel can interfere with the introduction and extraction of an ammunition or a fired case. This is not uncommon on rimfire weapons that have experienced many dry shots. This type of damage is usually repairable by a gunsmith. A deformation on the central portion of the barrel (always possible, and especially on a smooth-bore weapon or a weapon whose barrel walls are thin) is more problematic to repair, but it is sometimes possible by a properly equipped gunsmith. In any case, it is advisable not to fire a weapon damaged in this way.
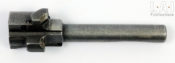
- Some barrels have locking areas (especially automatic pistols), so these areas must be controlled. This inspection must be carried out at the same time as that of the bolt locking lug(s). It must reveal a clear flat locking aera. A slight burr in the corners can be considered acceptable. Some weapons have locking extensions tied to the barrel that, if they are more like a frame than a barrel, will be inspected here.
- Absence of bulge. The presence of a bulge is prohibitive to the maintenance in service of an operational weapon. This type of deterioration occurs during a shot with the presence of foreign bodies in the barrel (in particular, water, oil, stuck bullet…). Several theories can be encountered about the exact phenomenon that can lead to the creation of this bulge. The one we find the most coherent states that the sudden deceleration of the projectile generates a reflux backwards of the gases which collides with the flow of gas from the chamber. The meeting of these two flows, from opposite directions, will cause a localized suppression peak from which would result the deformation of the barrel. The result is an “overpressure bulge”. On some weapons, when this ring is located very close to the mouth, a re-machining (or even a cut) of the barrel can be considered by a professional (Pic.18 and 19).
- Deformation of the barrel: a barrel can be bended. This inspection is carried out by visualizing the reflections inside the barrel by exposing it to a non-direct light source. If the reflections are straight, then the barrel is not bended. If the reflections have a curvature, the barrel is bended. In some cases, the barrel can be rectified by a properly equipped professional. It should be noted here that this type of problem is extremely rare on equipment of current manufacture.
- Gas port: As we saw in Chapter 6, in a gas operated weapon, the barrel is usually drilled by one or more ports. The wear of these ports can be responsible for gas leakage at the intake of the gases which will have the consequence of weakening the rearmament impulse. This wear is observed with a borescope and its consequences are validated by weakly holding one’s weapon during a test shot what is called “weak shooter”. This test is done after having ruled out any other factor of malfunction and in particular by the use of ammunition totally in line with the weapon and an irreproachable chamber condition. (Pic.20)
- HeadspaceDistance between the rear support surface of the ammunition ... More: we will detail this process during the control of the breech mechanism, because this control is done by associating the breech mechanism and the barrel. Depending on the mechanics, the headspaceDistance between the rear support surface of the ammunition ... More can involve the receiver.
- Conformity of the chamber: regardless of a valid headspaceDistance between the rear support surface of the ammunition ... More inspection, the chamber may have non-compliant dimensions. These can be too wide a diameter in places, or even walls that do not support the case for a sufficient length.
I-b.) Breech mechanism
The breech mechanism is the second part to be checked. We will discuss here several points to control, with and without tools.
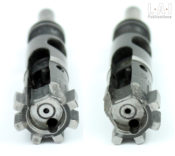
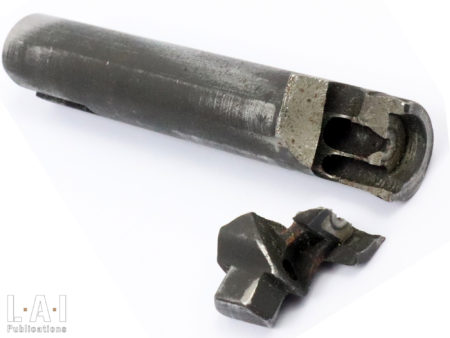
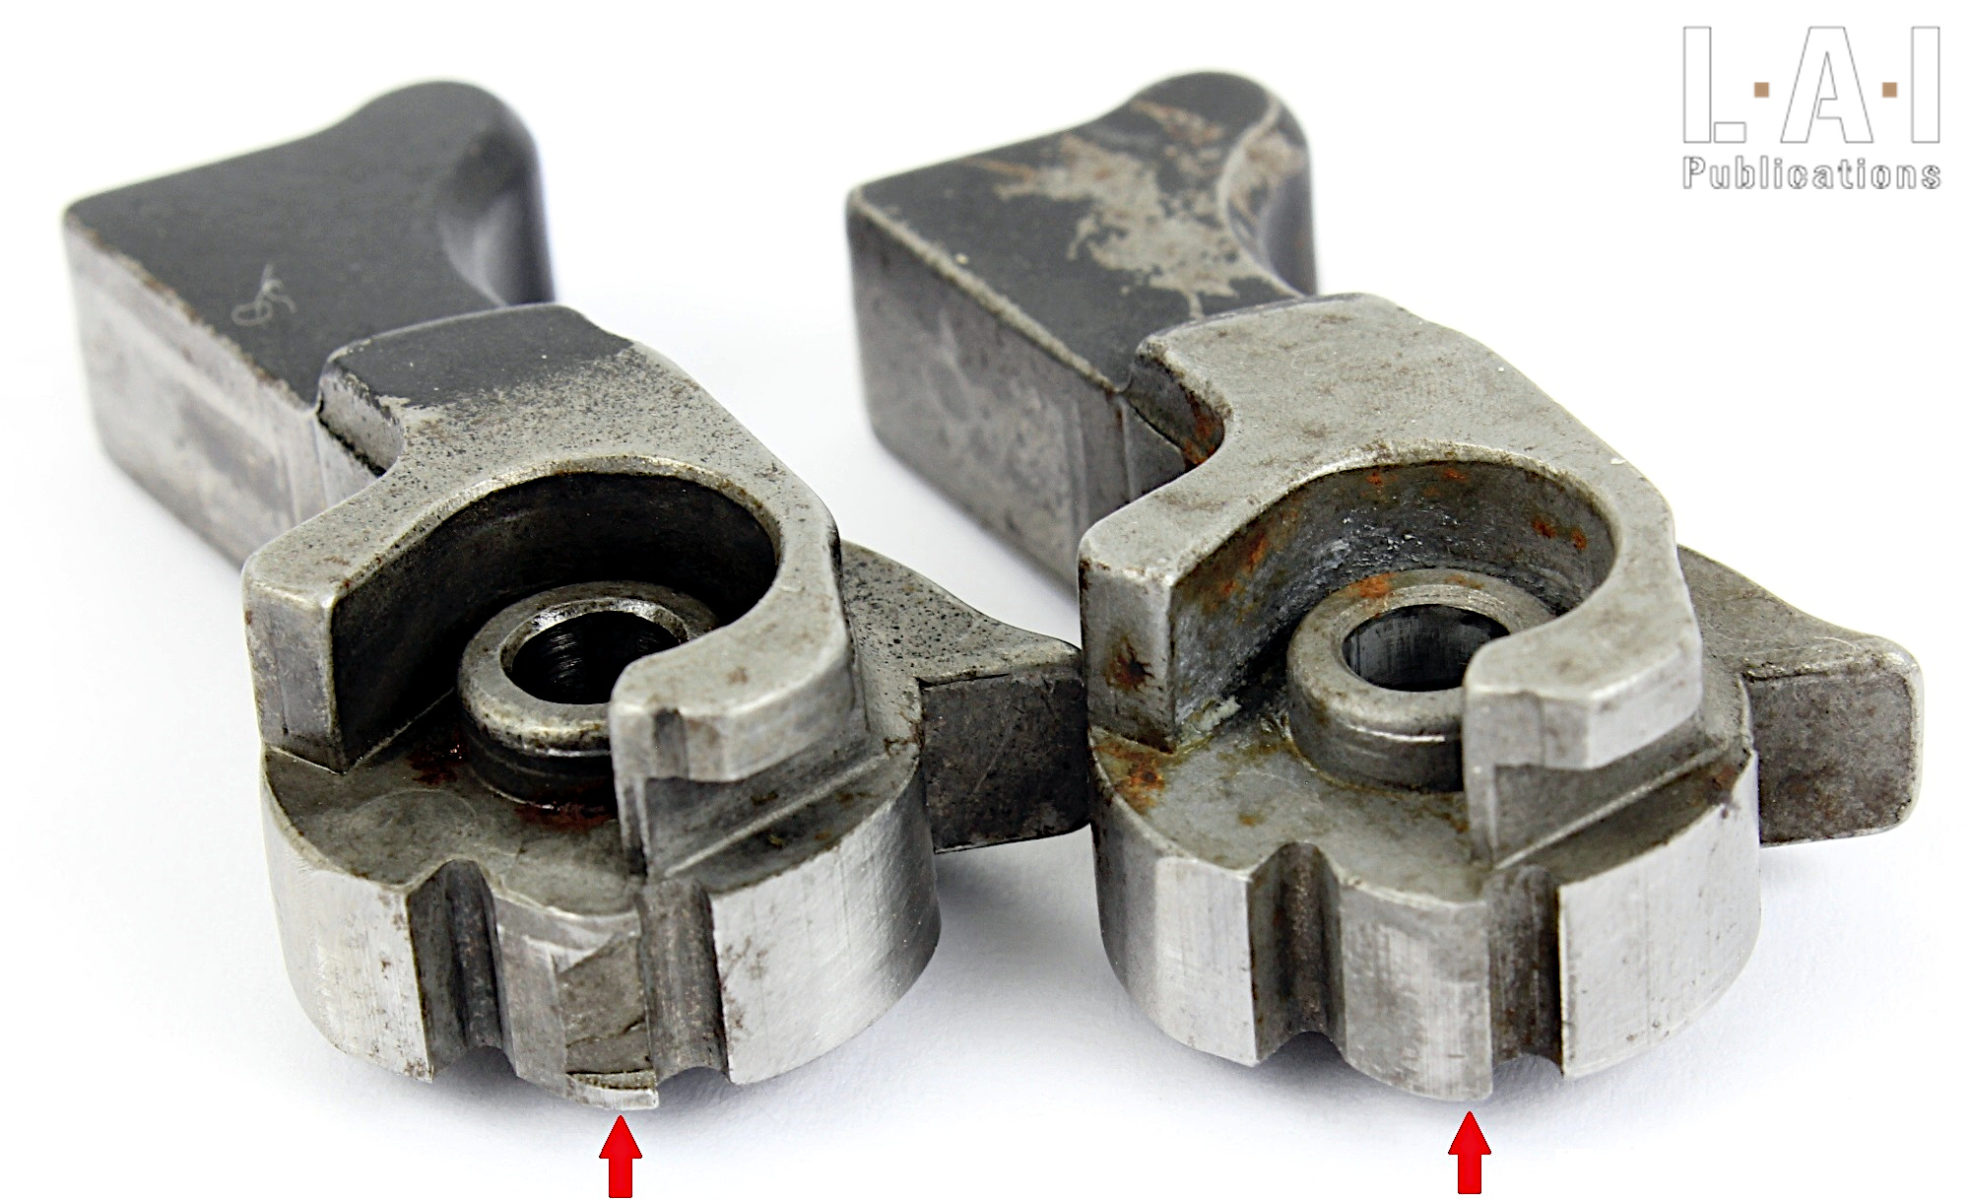
- For locked mechanisms: no crack or crack initiation on the locking elements. For automatic pistols that lock in the ejection port, no crack or crack initiation around said ejection port. The presence of the slightest crack or crack initiation around the ejection port is prohibitive to the keeping of the weapon in service. The repair of such a part is understood only by the replacement of the defective part. Economically speaking, it is often better to “scrap” the weapon and acquire a new one. The appearance of cracks on the locking elements can be a sign of the end of life of the weapon. (Pics.21 to 23)
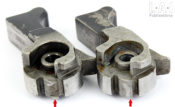
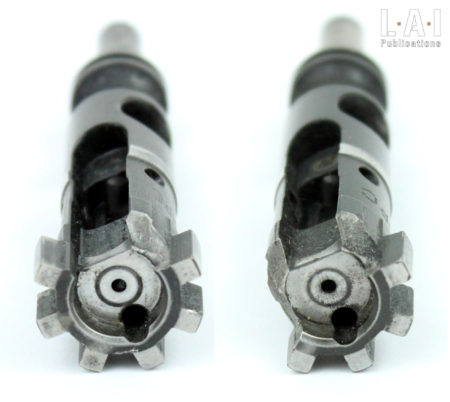
- For locked mechanisms: acceptable wear of the locking lug(s). This control is carried out at the same time as that of the locking area(s) of the barrel or of the receiver. It must reveal clear flat locking areas. (Pic.24 and 25)
- Correct condition of the surface of the bolt faceThe bolt face is the part of the bolt which in set place the... More: it must be smooth and free of oxidation. On weapons whose ammunition mounts the head in contact with the bolt faceThe bolt face is the part of the bolt which in set place the... More, the latter must allow a good sliding of the ammunition during the feeding phase. (Pic.26)
- HeadspaceDistance between the rear support surface of the ammunition ... More control: once the barrel control and the inspection points mentioned above concerning the breech mechanism are carried out, the headspaceDistance between the rear support surface of the ammunition ... More control can be carried out. If the bolt locks into the receiver, the check of the receiver and in particular the locking areas will be carried out beforehand. The headspaceDistance between the rear support surface of the ammunition ... More control process is carried out as follow: the gauge is manually inserted into the barrel, ensuring that the extractor is correctly taken into account (if the gauge required it) and the breech mechanisms are driven forward. The “go” gauge must allow the mechanisms to be closed (and locked in locked weapons). The “no-go” gauge must not allow the mechanisms to be closed (und thus, not locked). Warning: a no-go gauge sometimes refers to a maximum permissible headspaceDistance between the rear support surface of the ammunition ... More for the manufacture of a weapon and not a maximum permissible headspaceDistance between the rear support surface of the ammunition ... More for that caliber. Indeed, it is understandable that manufacturers are careful not to market weapons whose headspaceDistance between the rear support surface of the ammunition ... More is close to the maximum established by the standard used. As always, these types of tools must be used in a documented manner. Also, there are “field” gauges: these must not allow closure or locking. A weapon that closes or locks on these last gauges is dangerous to shoot with. For example, the headspaceDistance between the rear support surface of the ammunition ... More gauge set for the SP 2022 pistol included the following gauges: GO (19.15 mm), NO-GO (19.45 mm) and finally FIELD (19.62 mm). Once the check is done, the gauge is removed, taking care not to “eject” it: this type of tool is fragile, and a deformation could lead to its uselessness.
- The various devices peripheral to the bolt faceThe bolt face is the part of the bolt which in set place the... More (in particular extractor, ejector and loading indicator) must be in good condition, have their latitudes of movement and their original return forces. The assessment of the normality of the return forces can be acquired by dint of control.
- Free movement of the firing pin in its channel: the breech mechanism almost systematically welcomes the firing pin. It is therefore necessary to ensure that the firing pin can move well in its channel (protrusion in the bolt faceThe bolt face is the part of the bolt which in set place the... More and withdrawal). It is not uncommon for fouling (carbon deposit or even ammunition fragments) or oxidation to strongly impede the firing pin’s travel. This can result in percussion defects or, conversely, untimely departures when the bolt faceThe bolt face is the part of the bolt which in set place the... More is closed. For mechanisms with a “firing pin lock”, this will be done by first erasing the firing pin lock and then pushing the rear of the firing pin. Please remember that the percussions “hit and press” and “hit and throw” do not produce protrusion in the same way (cf. Chapter 6).
- Absence of deformation that may affect the free circulation of the breech mechanism.
I-c.) Frame – Receivers
The frame is the third part to be checked.
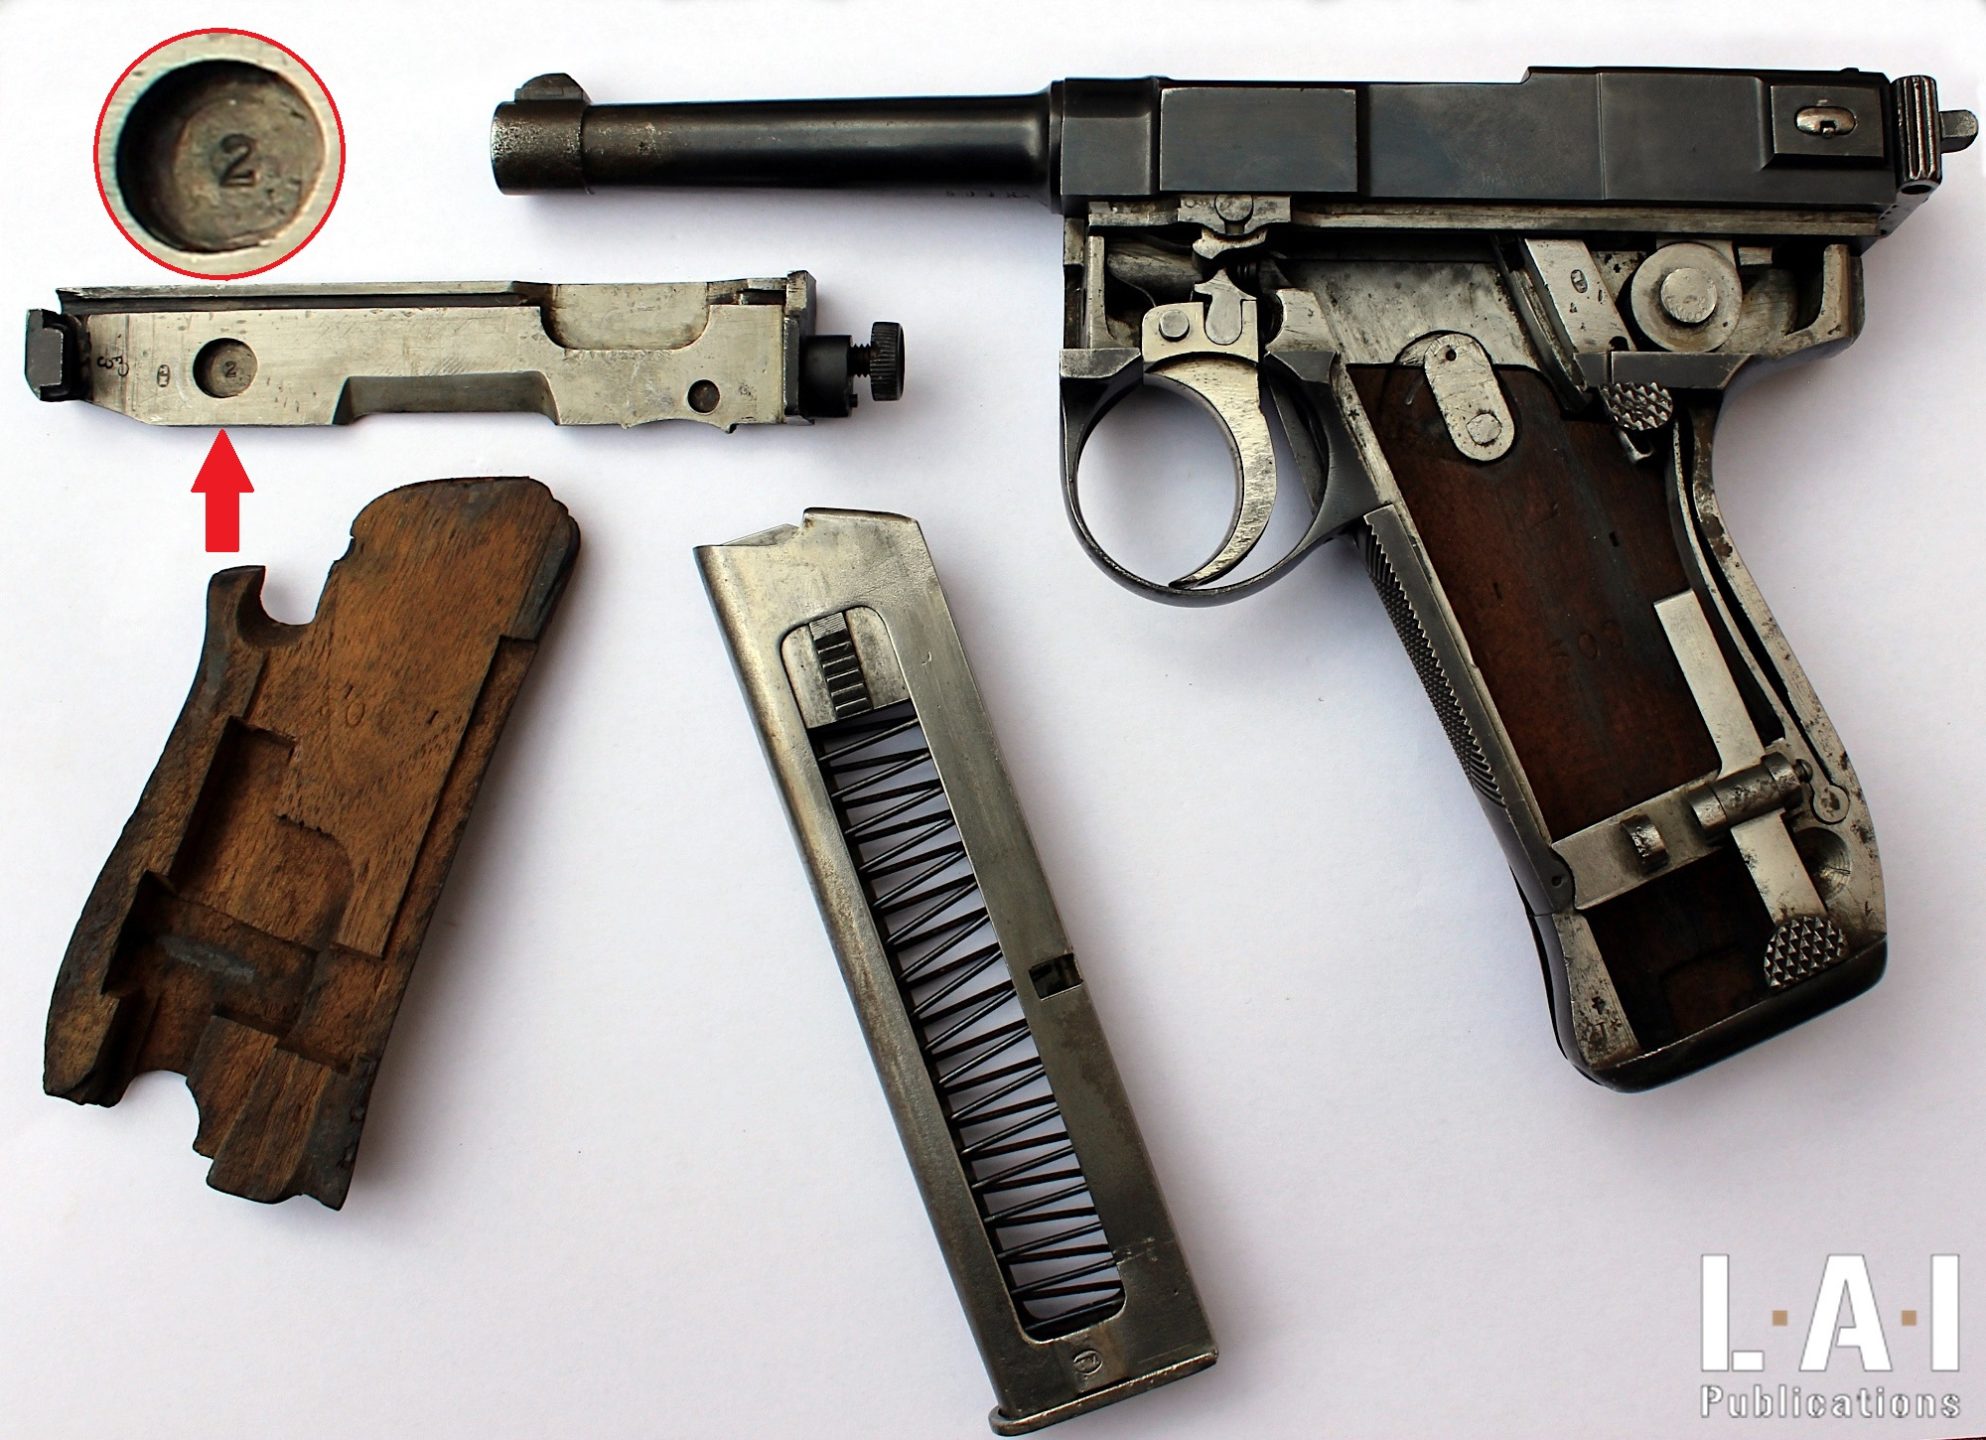
- For locked or mechanical advantaged system, no crack or crack initiation. Here too, the presence of the slightest crack or crack initiation is prohibitive to the maintenance in service of the entire weapon. The repair of such parts is understood only by the replacement of the defective part. Sometimes it is better to “scrap” the weapon and acquire a new one. The appearance of cracks on the locking elements is often a sign of the end of life of the weapon (Pics.27 to 29).
- For weapons with mobile breech mechanism, check the free movement of the breech mechanism. Any element which may constitute a brake on its circulation, and which is not normally provided for in the design of the weapon must be corrected.
- Receivers often have interfaces for sighting: check their integrity.
- On handguns, the frame generally constitutes the pistol grip: check that nothing hinders the proper grip of the weapon or that no degradation alters safety aspects (deformation or breakage of the trigger guard …)
I-d). Springs
Springs are the parts often most damaged by using the weapon (shooting, handling, but also sometimes storage). Also, it is necessary to pay particular attention to the latter, and not hesitate to carry out here preventive replacements. This vigilance can be achieved with the help of adequate tools but also by comparison with brand new parts. Preventive replacements can ensure better operation of the weapon as well as extend the life of certain parts of the weapon. Particular attention may be paid to the following points:
- Springs must be in their original geometries: straightness, regularity of the coils and diameter must not be excessively altered.
- They must not be oxidized, especially those rubbed on a guiding rod or in a housing. For the record, during its compression, a coil spring tends to see its diameter increase.
Finally, the decline of springs is linked to a restructuring of the metal. Thus, their forces, qualified in mechanics as “stiffness” are altered by this restructuring, which is the product of the work of time and constraints. It is therefore completely illusory to believe that the stretching of the springs could bring them back into conformity.
I-e). Sights
The sights must be suitably centered on their support, clear and free from deterioration, in particular following an impact. On most current production weapons, it is inconceivable that a properly adjusted weapon would have significantly off-center sight. In all cases, a significant off-set of the sights must lead one to wonder: state of the barrel, weapon / ammunition match… and even the skill of the shooter (cf. Chapter 9)! On what we shall modestly describe here as “economic” manufactured or some old weapons, this type of observation is nevertheless possible in a weapon in good and due form.
I-f. Feeding systems
Providing part of the guidance of ammunition during the feeding phase, the feeding systems are often a source of failure. Whether they consist of internal parts of the weapon (shell latch, shell carrier…) or removable parts (magazine), these must not suffer from any failure. The following points can be checked:
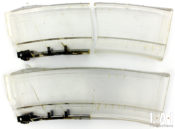
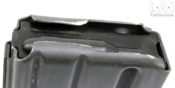
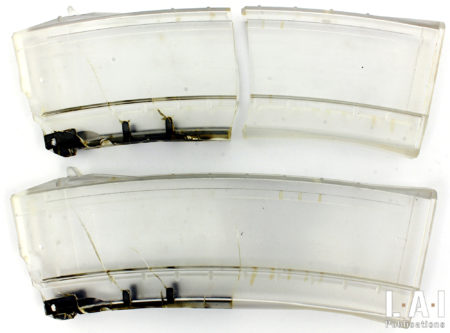
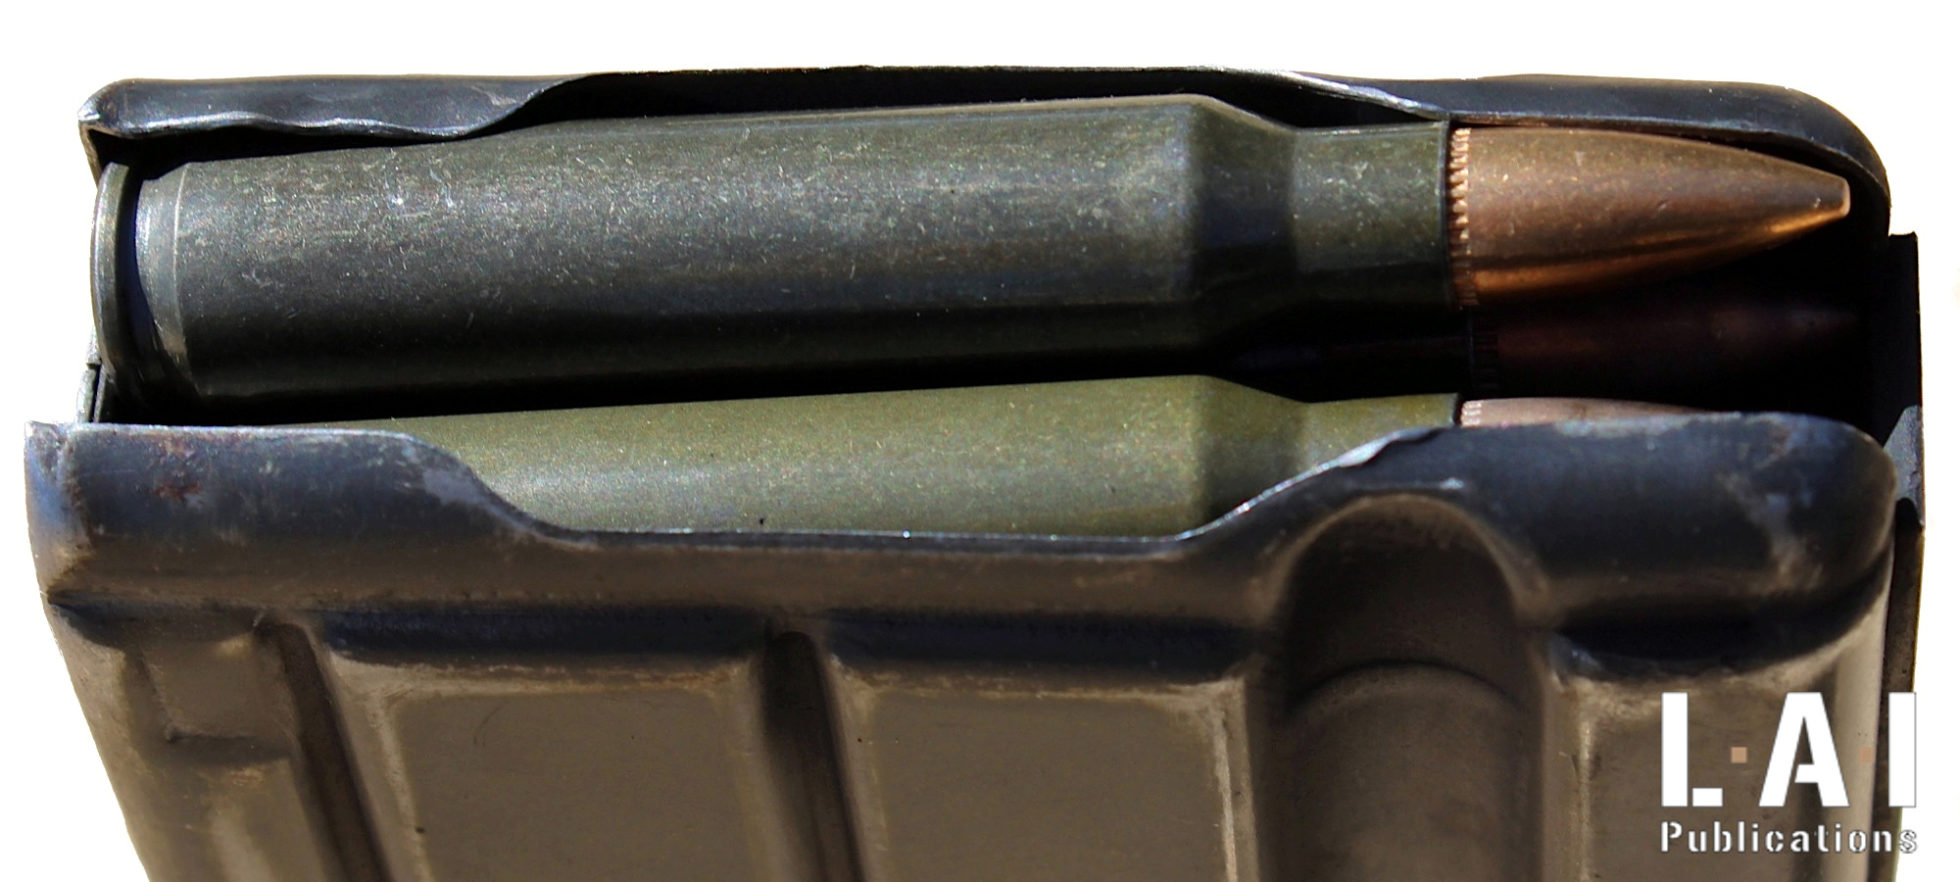
- The bodies of magazines, internal magazines or any other ammunition storage device must not show: traces of excessive oxidation, deformation (especially for sheet metal magazines) or cracks (especially on magazines made of synthetic materials) (Pic.30 to 32).
- Like any other springs, those of the feeding systems must not show any alteration. In addition, some springs have sometimes a mounting direction that must be respected.
- The follower must not be damaged. It must be taken into account that their geometry is involved in the speed of presentation of the munition. Also, when these followers have guidance elements originally “long” these must not be altered.
- Floorplate must not show deterioration that could lead to fragility or breakage of the parts.
I-g. Other device or sub-assemblies
We cannot list here exhaustively all the mechanisms that can be encountered on a firearm. However, we will draw up a list of recurring parts and points to be checked.
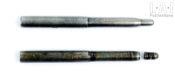
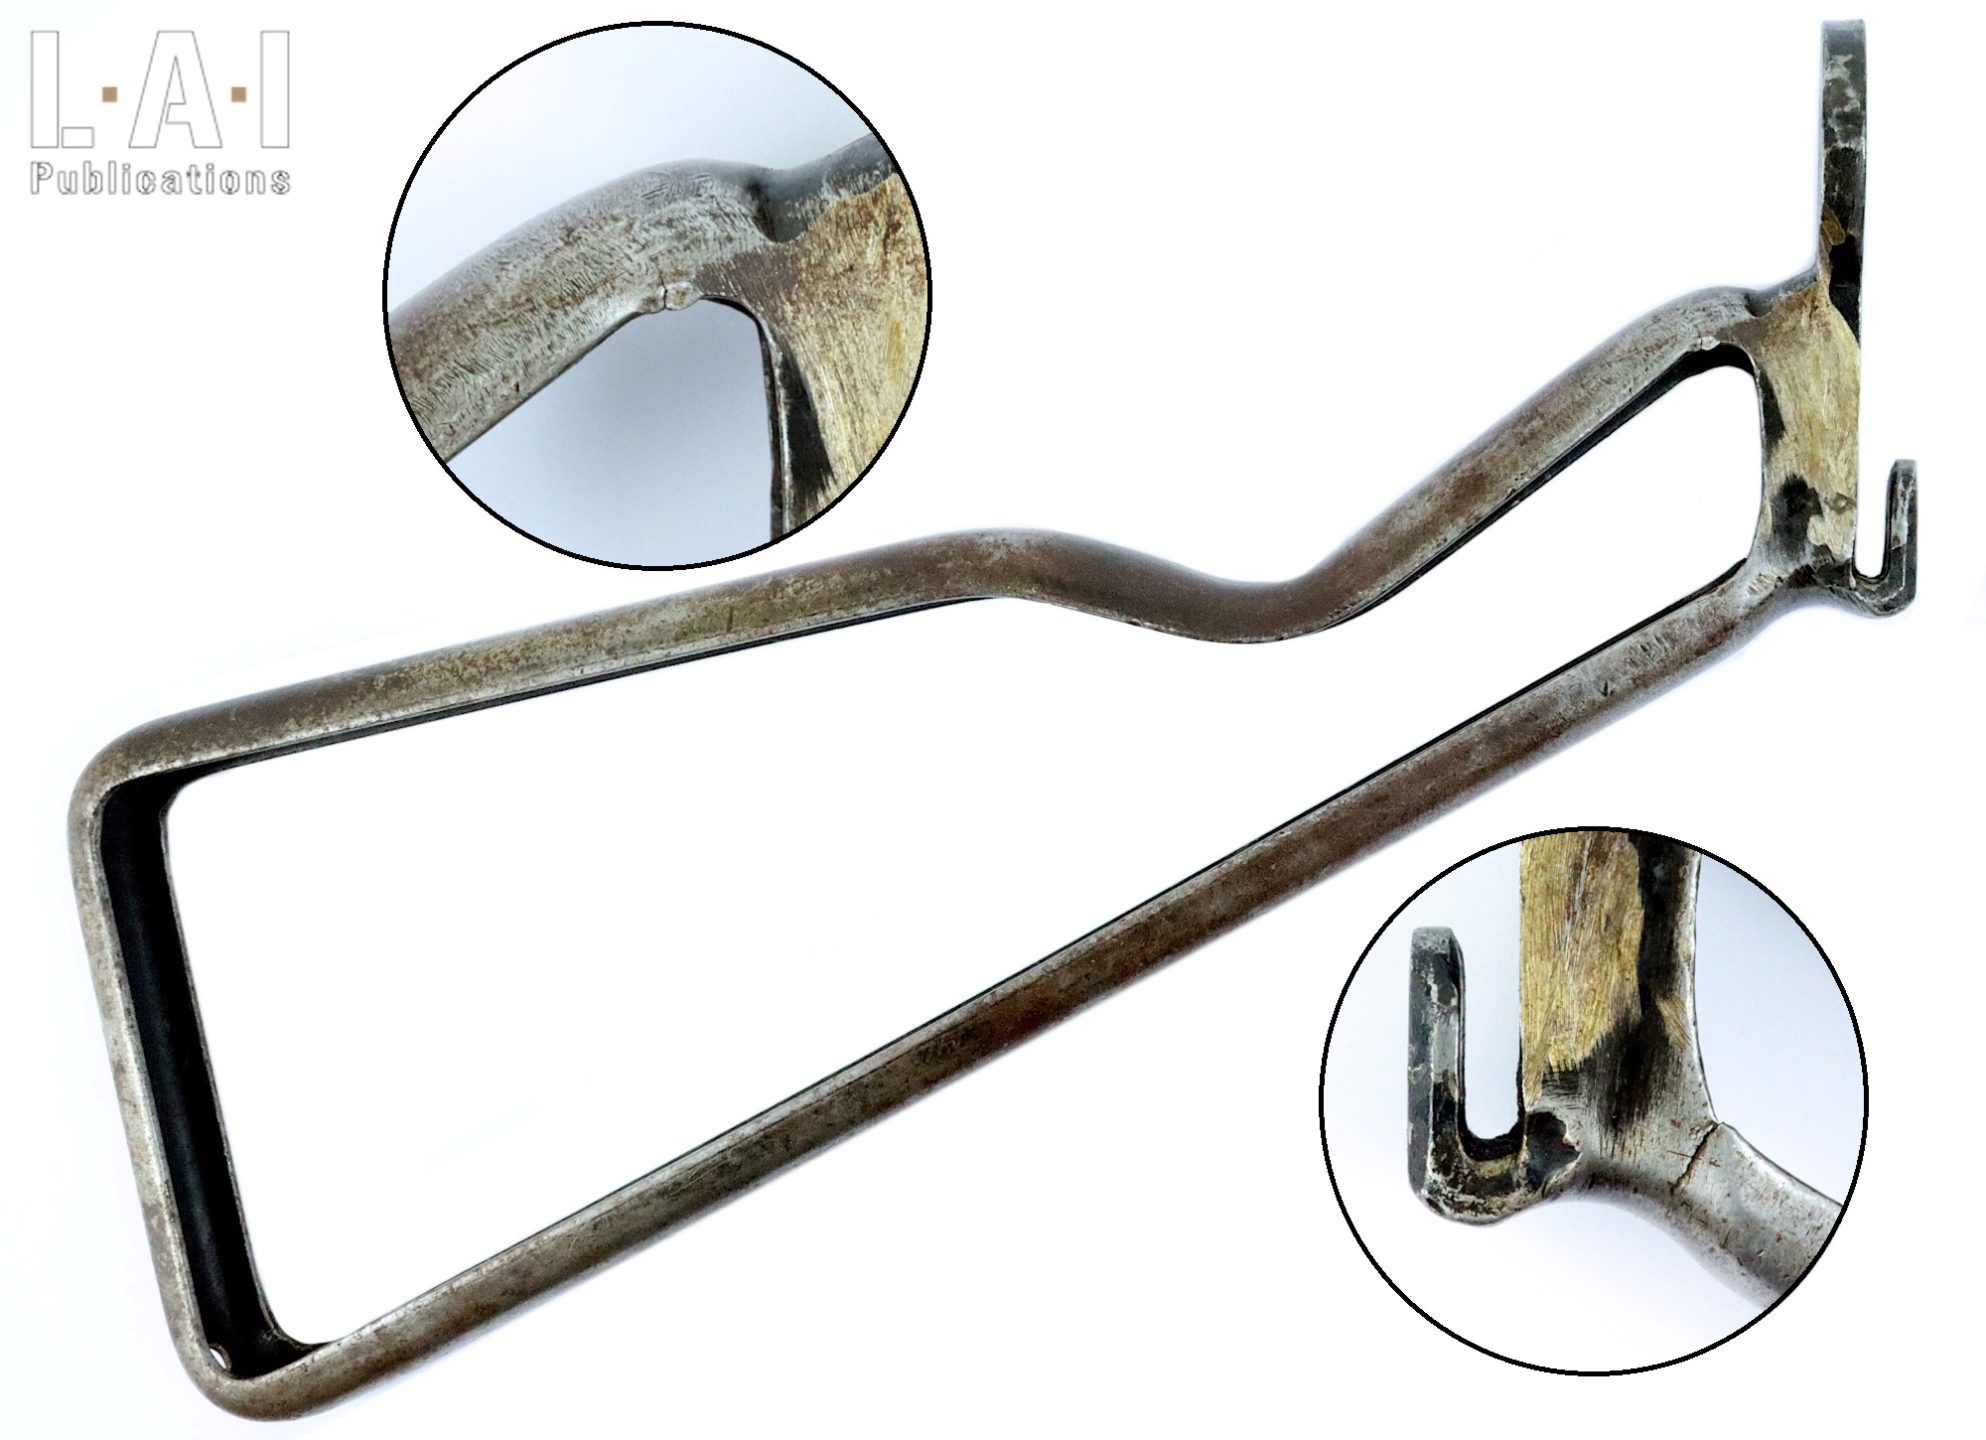
- Check the condition of the firing pin: the tip, the rear and if necessary, the cocking notch must be in good condition (Pic.33).
- Check the correct movement of each moving part.
- Also check the sub-assembly function: cocking and releasing of the hammer, catching of magazine, sliding of the moving parts, safety operation, firing mode operation, furniture’s (stock, hand-guard, pistol grip)… (Pic.34 and 35)
Warning: during these checks, it is possible to injure yourself with a part of the weapon, especially with the hammer during its release.
III. Verification of assembled weapons
Once each part has been checked and at the end of the lubrication step mentioned in the next chapter, a series of verifications can be carried out on the assembled weapon. Of course, the checks to be carried out depend on each weapon, but they systematically have the same goal: to verify the proper functioning of the different devices and the correct interaction between the parts. We can establish a list – not exhaustive – of controls to be carried out on most weapons. Chronology can be important to respect.
As these manipulations will include “shooting actions”: be careful to position your weapon in a direction likely to absorb an accidental shot.
For weapons with a removable magazine, checks begin with a disengaged magazine.
After clearing the weapon and by positioning the weapon in front of a direction likely to “absorb” an accidental shot, one can proceed as follows.
- Operate the breech mechanism in open position and then drive them to close position: no obstacle should be noted. For weapons firing from an open bolt, it will be necessary to pull the trigger to carry out these checks. Think about safety first.
- Operate the manual safety of the weapon and check their effectiveness. This verification can be carried out simply by sound report: cocking trigger mechanism, safety engaged, the action of the trigger must not generate noise.
- If the weapon has shooting modes (single, burst, and full-automatic), check each of these modes. Here too, the verification is most often audible. For each firing mode, the trigger mechanisms are cocked, then pull and hold the trigger. A first release must be noted. Always holding the trigger, the weapon is manually cycled. Depending on the selected firing mode, the result should be different. On single shot mode, no other release should be heard after a first cycle. For a burst mode, as many shots as necessary are cycled until the firing is interrupted: the release number noted (including the first) must correspond to the manufacturer’s specification. For the full-automatic mode, as long as the trigger is pulled, there must be a release after each closure, and when the trigger is freed, no release must be seen or heard.
- For weapons which perform automatic-firing, check that the release of the trigger mechanism occurs after locking (for weapons that are locked) or at the very end of closure (for weapons that operate from a blow-back principle). Here too, the verification is often audible.
- For weapons with removable magazines, test the catch and proper release of each magazine.
- For weapons with a bolt stop, check it with an empty magazine. For weapons with removable magazines, perform this check for each magazine.
Inspection is a crucial point in keeping a weapon in service, regardless of your specialty. Also, if you are a professional, submit to the inspections scheduled by your institution: your weapon is for you a life insurance. If you apply scrupulous maintenance of your weapon, then you do not have to fear any remonstrance. For other users, apply a first check yourself and do not hesitate to question the professionals who are at your disposal. Finally, for hunters, do not wait for the beginning of the season to have your weapon checked if you feel the need!
This is free access work: the only way to support us is to share this content and subscribe. In addition to a full access to our production, subscription is a wonderful way to support our approach, from enthusiasts to enthusiasts!
 (1)
(1)
 (2)
(2)
 (3)
(3)
 (4)
(4)
 (5)
(5)
 (6)
(6)
 (7)
(7)
 (8)
(8)
 (9)
(9)
 (10)
(10)
 (11)
(11)
 (12)
(12)
 (13)
(13)
 (14)
(14)
 (15)
(15)
 (16)
(16)
 (17)
(17)
 (18)
(18)
 (19)
(19)
 (20)
(20)
 (21)
(21)
 (22)
(22)
 (23)
(23)
 (24)
(24)
 (25)
(25)
 (26)
(26)
 (27)
(27)
 (28)
(28)
 (29)
(29)
 (30)
(30)
 (31)
(31)
 (32)
(32)
 (33)
(33)
 (34)
(34)
 (35)
(35)
Pic.01: Didactic G3 rifle in conformity with the model within service in the German army.

Pic.02: SP 2022 in duty in the French law enforcement (National Police, Gendarmerie and Customs).
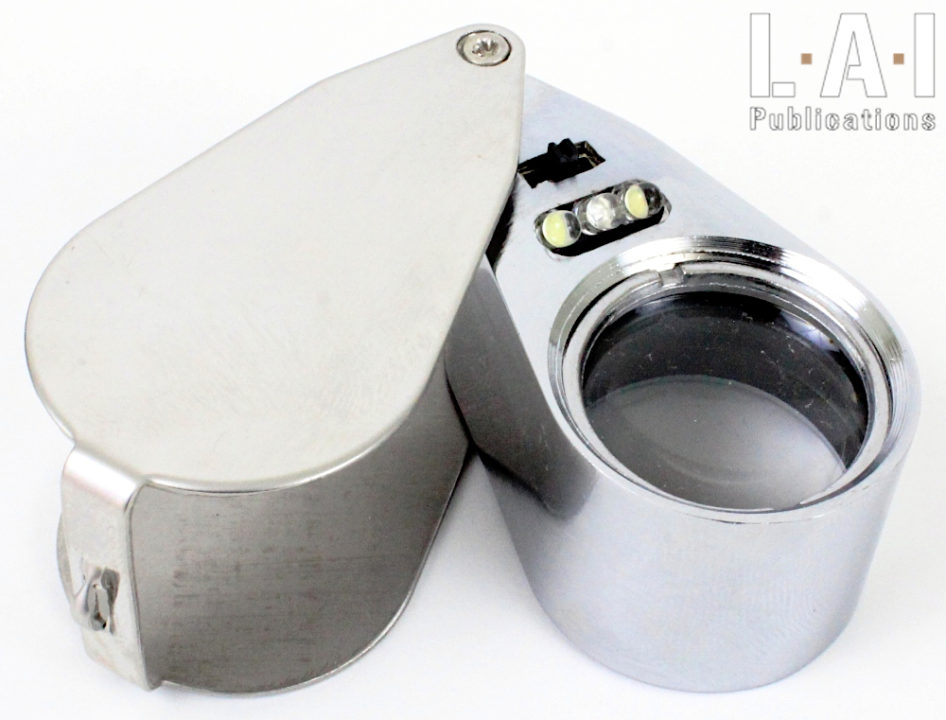
Pic.03: Watchmaker's magnifying glass with lighting. Very useful for checking parts and reading some markings.
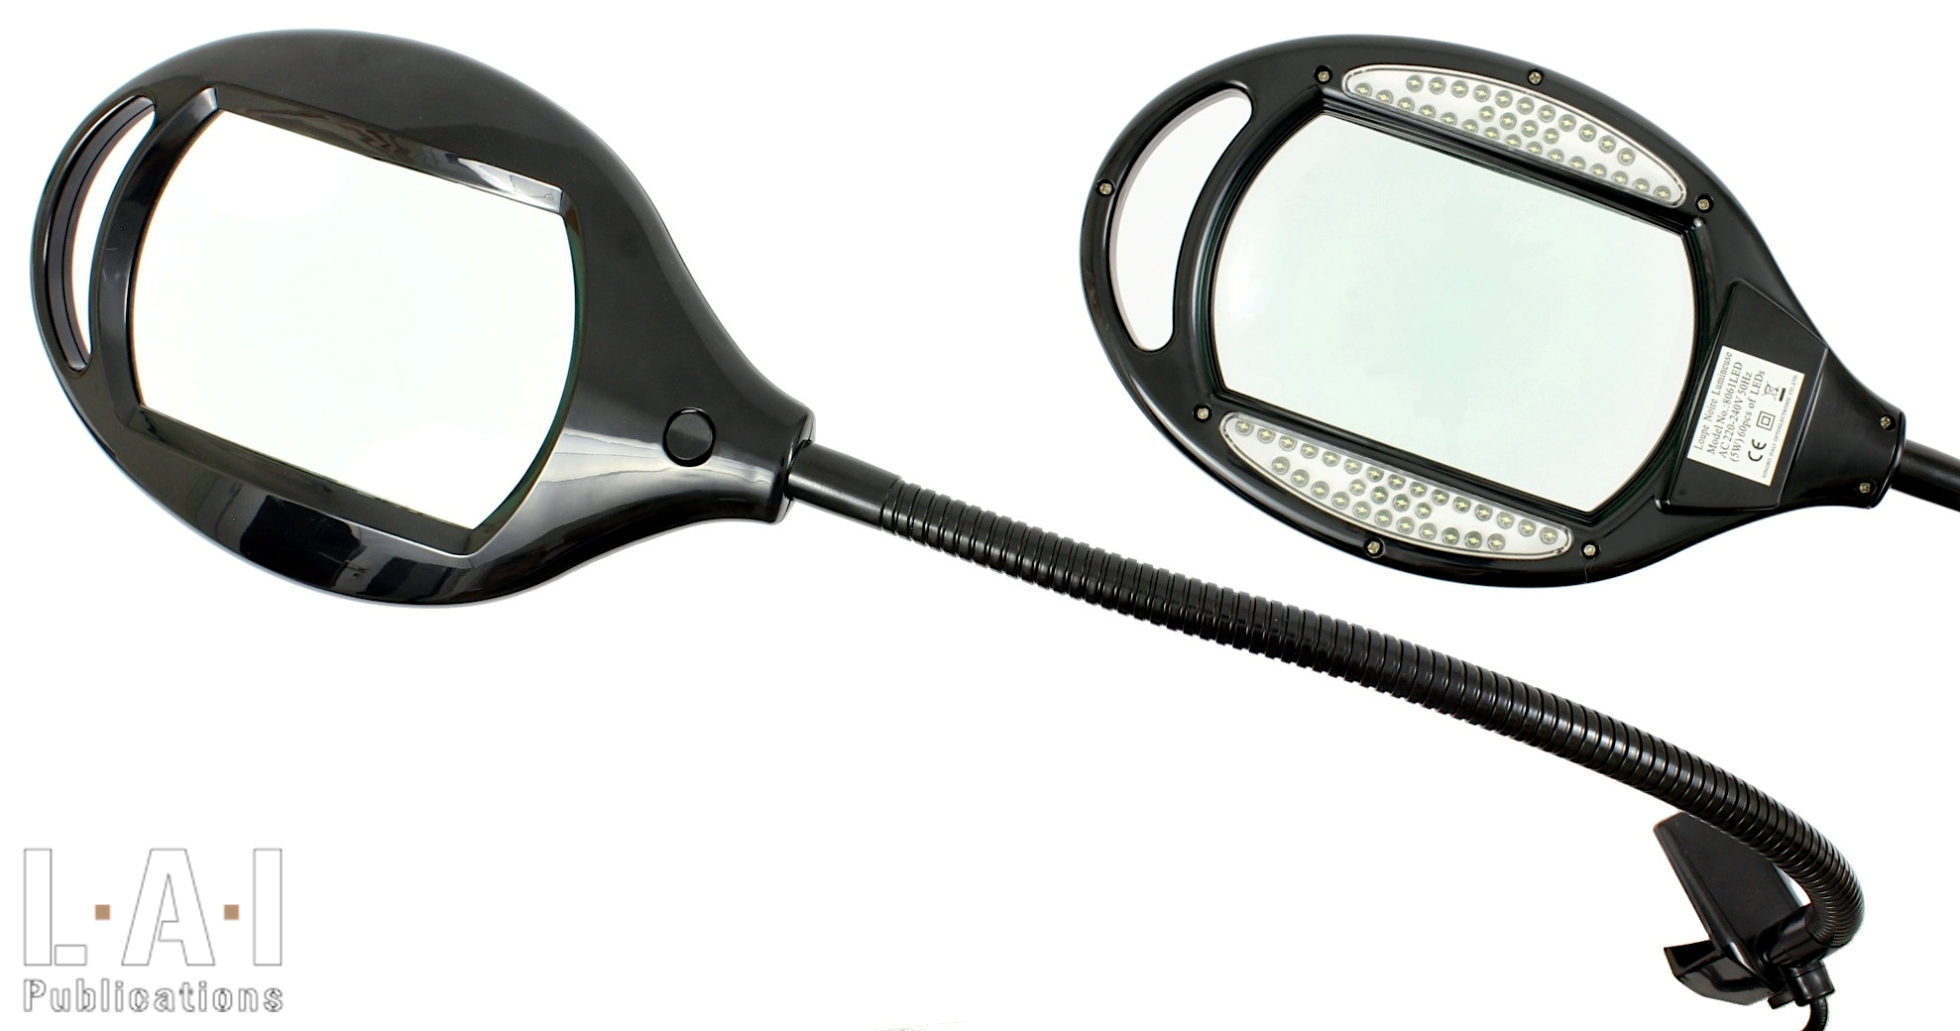
Pic.04: Table magnifying glass (here a mineralogist one, but this one does the trick very well!). The underside of the magnifying glass, visible on the right, has lighting adapted to the observation of our weapon parts.
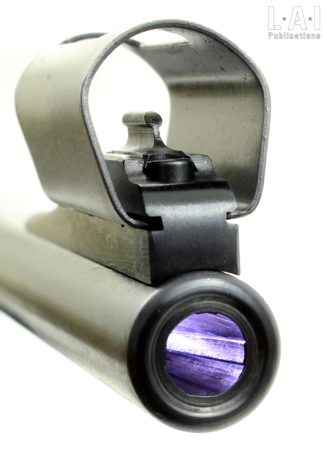
Pic.05: Inspection lamp. This has a protective sheath around the bulb. This sheath protects the bulb and allows the lamp to be in contact with the barrel without the risk of degradation.
Pic.06 : Inspection of the barrel of a 7.62x39 CZ 527M carbine using the lamp shown in the previous photo (Pic.5). It is necessary to modulate the lighting so as not to "dazzle" and thus distort the observation.
Pic.07: Optical fiber for inspection dedicated to 5.56x45 caliber. This device is also an empty chamber indicator for this caliber.

Pic.08: Optronic borescope. Observations with this type of tool are to be considered with a lot of hindsight, otherwise, you risk changing all your barrels permanently...
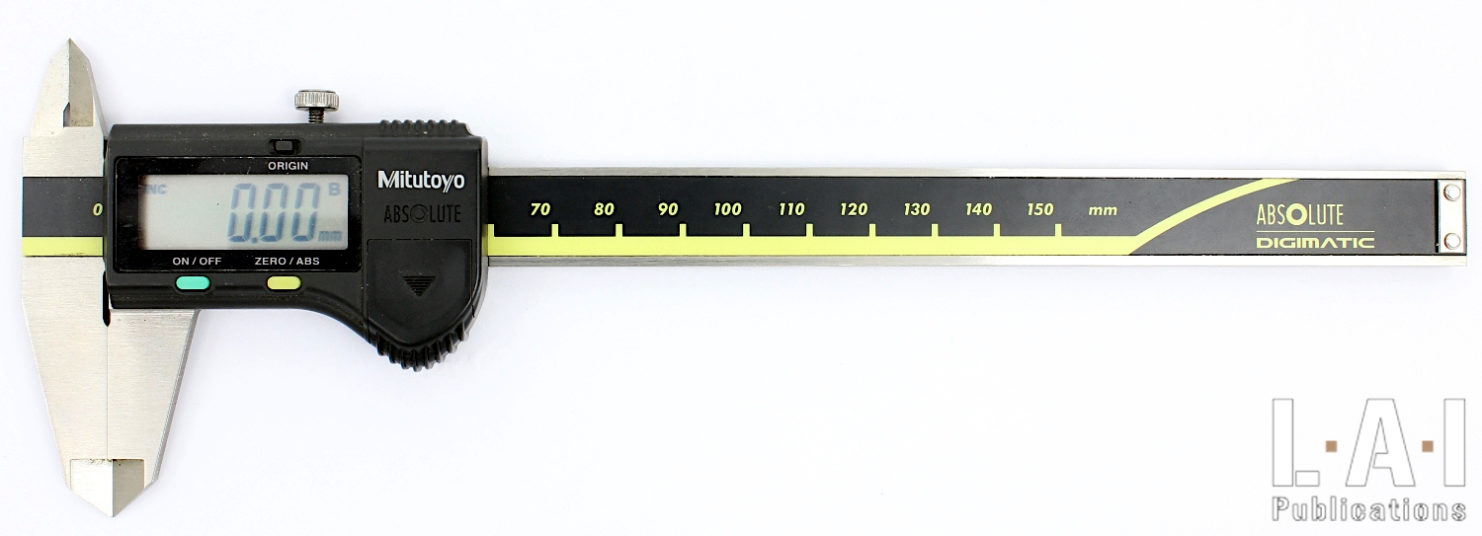
Pic.09: Caliper. Sufficient for most measurements.
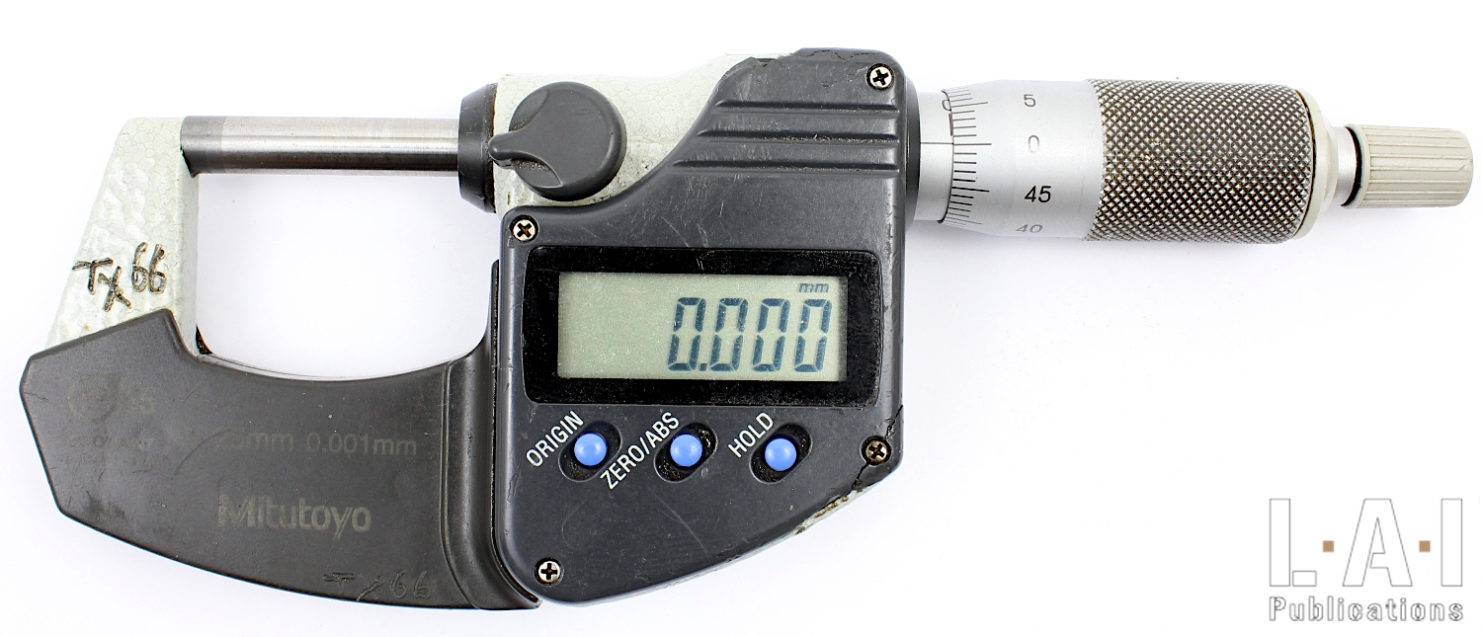
Pic.10: Micrometer. When the caliper is no longer enough... in other words, not often.
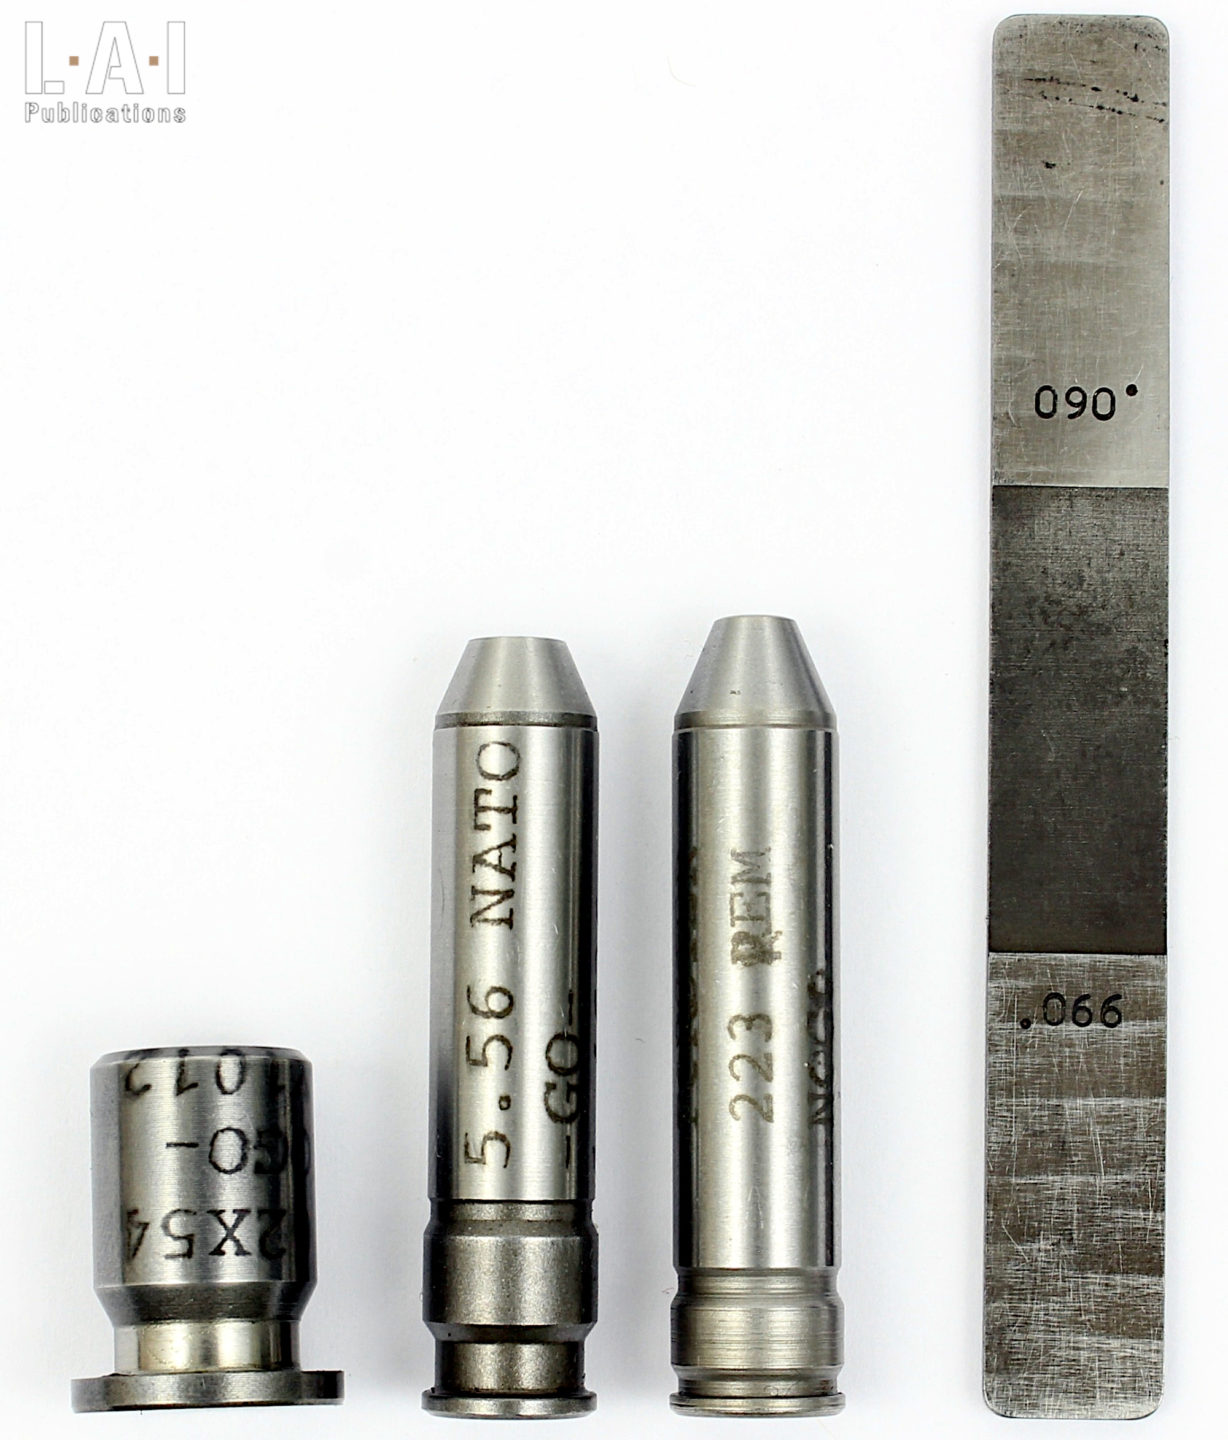
Pic.11: Panel of headspace gauges. From left to right: gauge for rimmed caliber 7.62x54 r, gauge for the rim-less and bottlenecked "5.56 NATO" and ".223 Rem", flat gauge for revolver (multi-caliber: .38 Special, .357 Magnum but also, .44 Magnum, .45 Long Colt ...). The 5.56 NATO and .223 Rem gauges logically designate gauges using different standard systems.
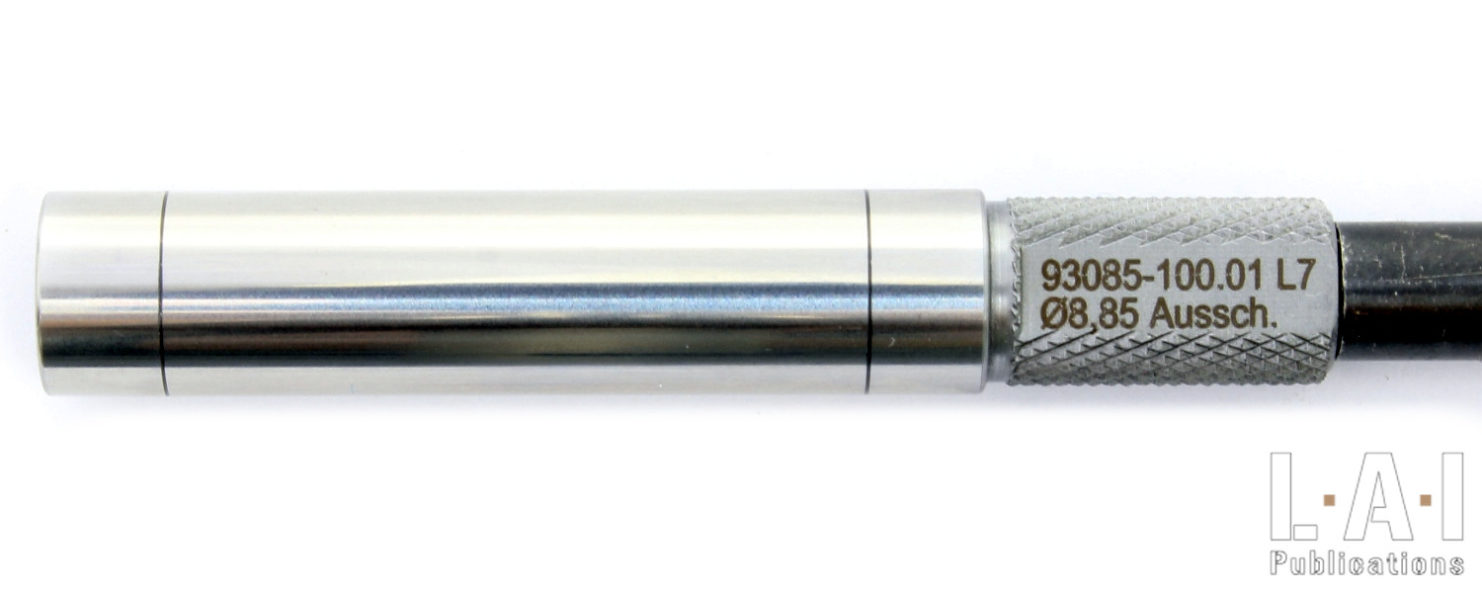
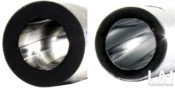
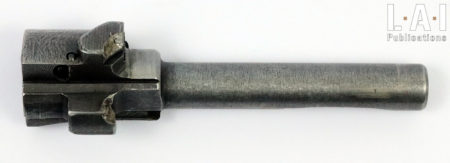
Pic.12: Bore diameter gauge of the 9x19 mm HK UMP SMG. The opposing lands control diameter is 8.85 mm. Combined with a special rod, this gauge should not reach beyond a specific depth.
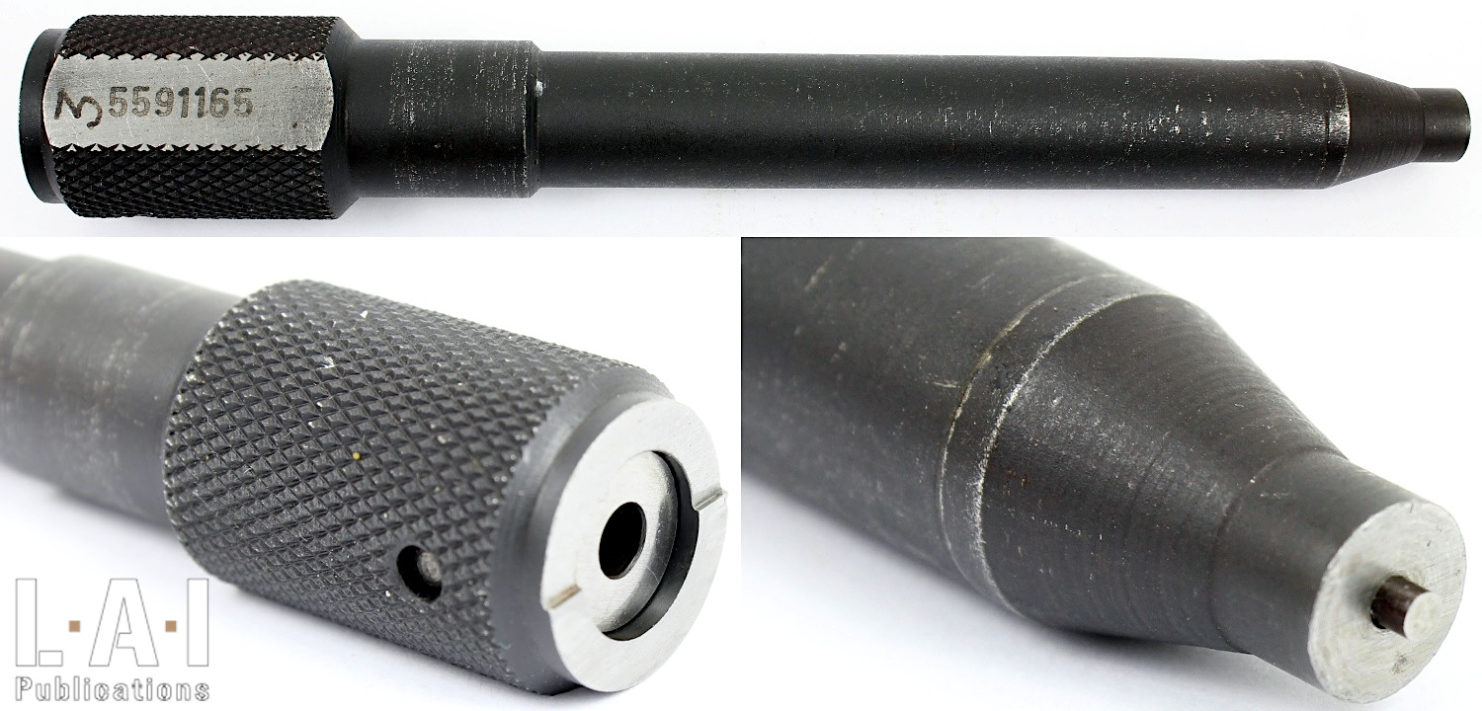
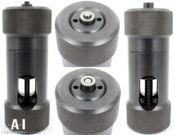
Pic.13: SP 2022 pistol firing pin withdrawal control tool. The purpose of this gauge is to check that the firing pin, that stops on its safety lock, does not exceed a safety clearance.
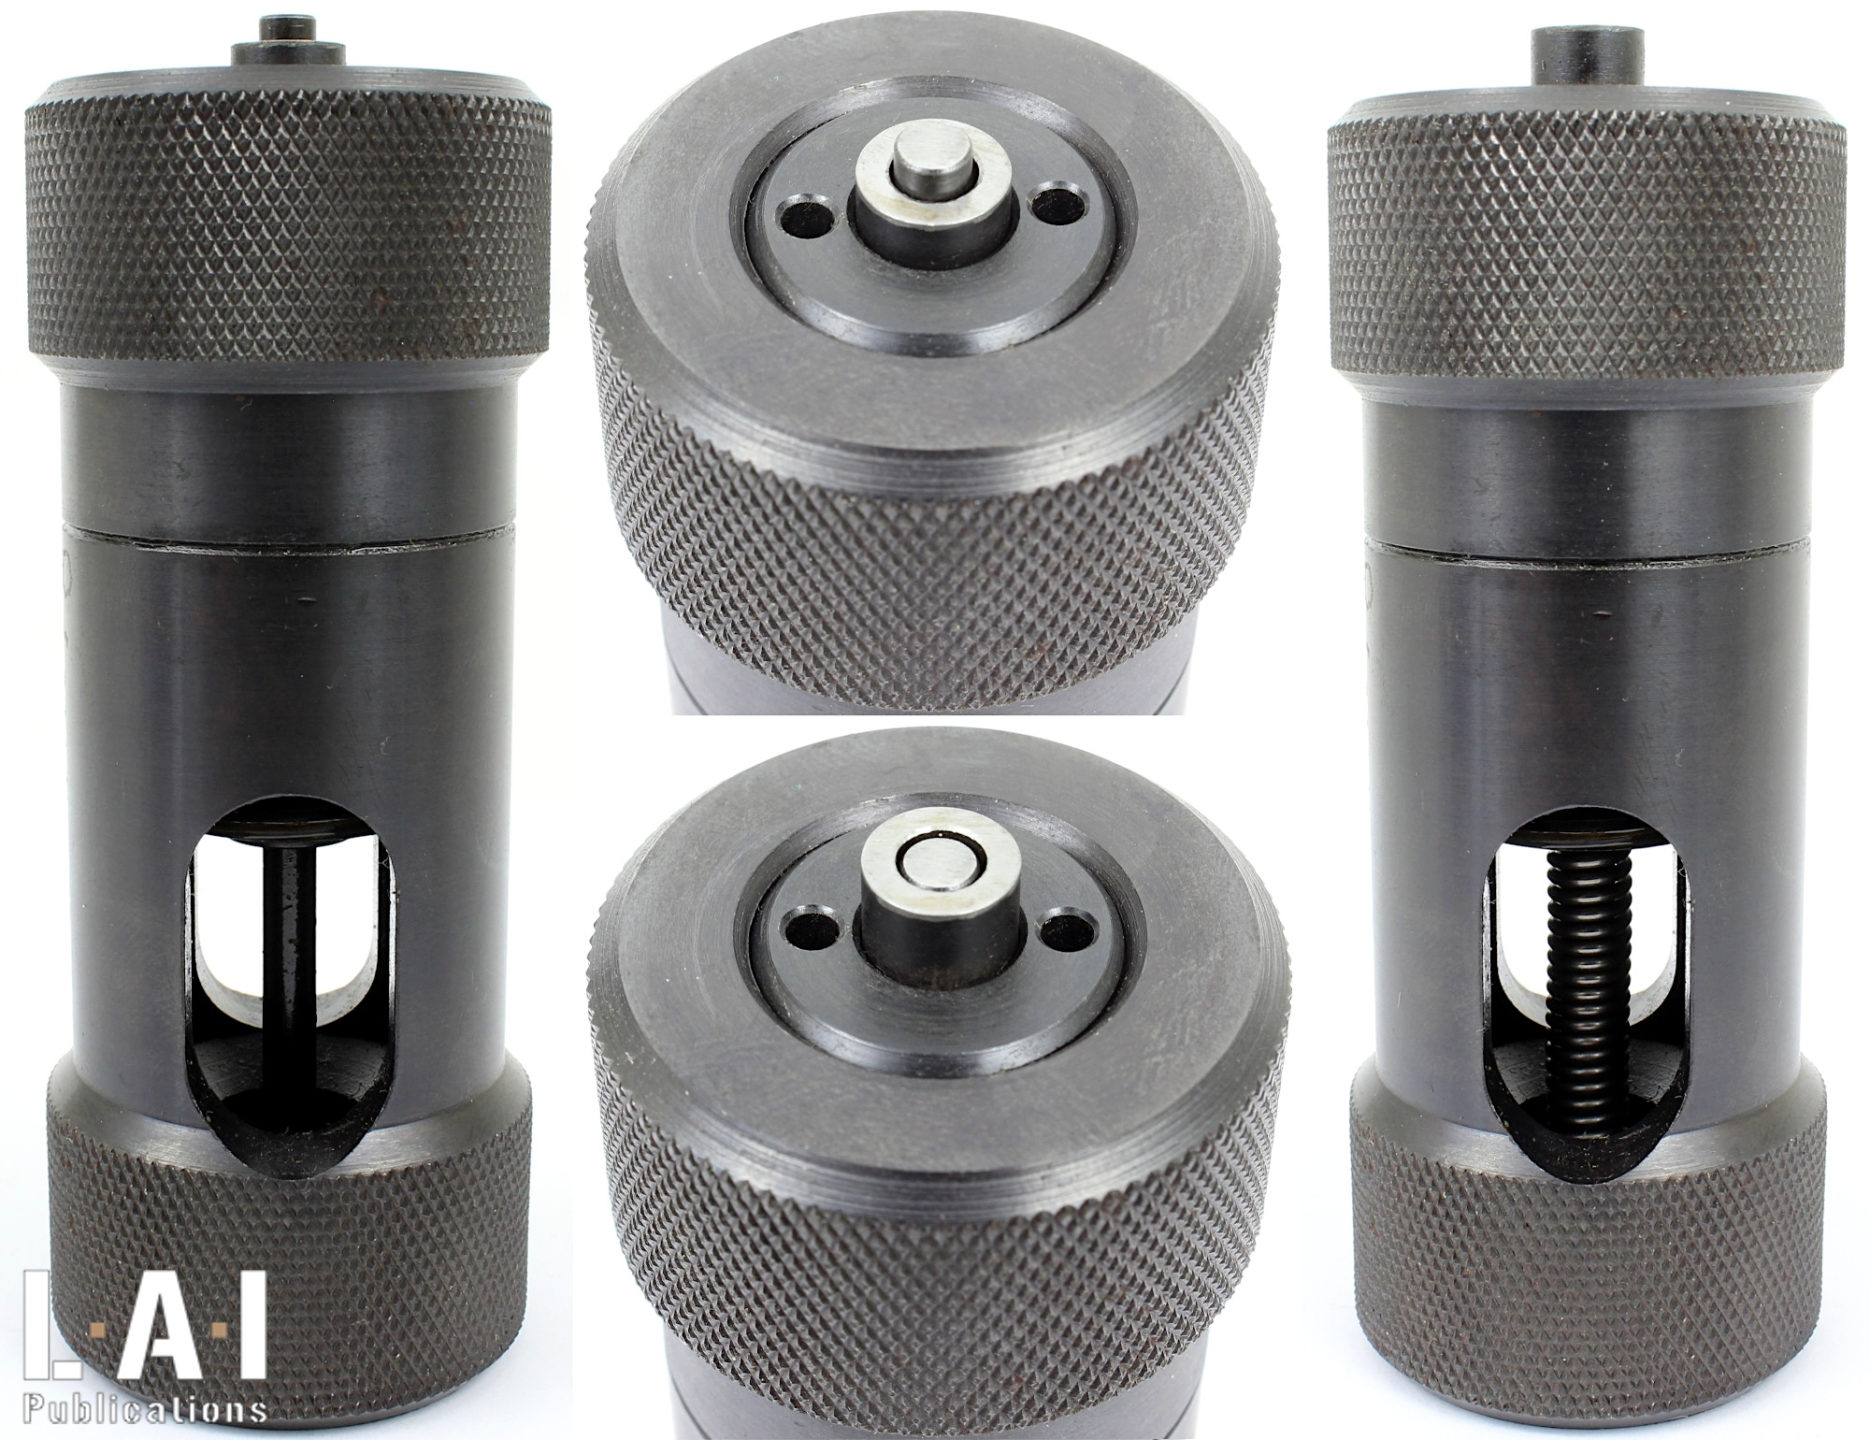
Pic.14: Tool for checking the good condition of the SP 2022 pistol hammer spring. Once the spring is in place (visible on the right), the peripheral indicator should not exceed the central rod at the top of the tool. In the center, at the top, the spring needs to be changed, at the bottom, the spring is good.

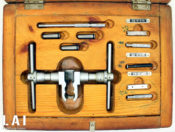
Pic.15: Control set for 7.62x39 caliber weapons: SKS-45 (56-И-231), AK-47 (56-И-212) and RPD-44 (56-И-327). It includes headspace gauges, extractor spacing gauges and firing pin protrusions gauges, bore diameter gauge and finally, the direction front sight adjustment tool already seen in Chapter 9.
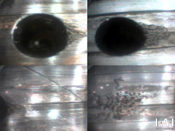
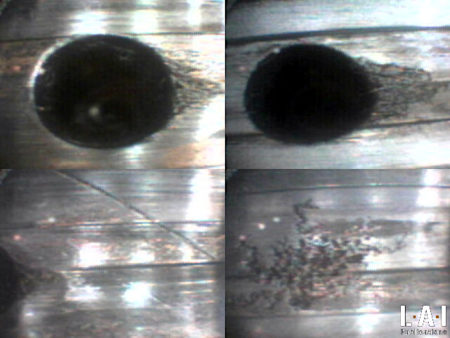
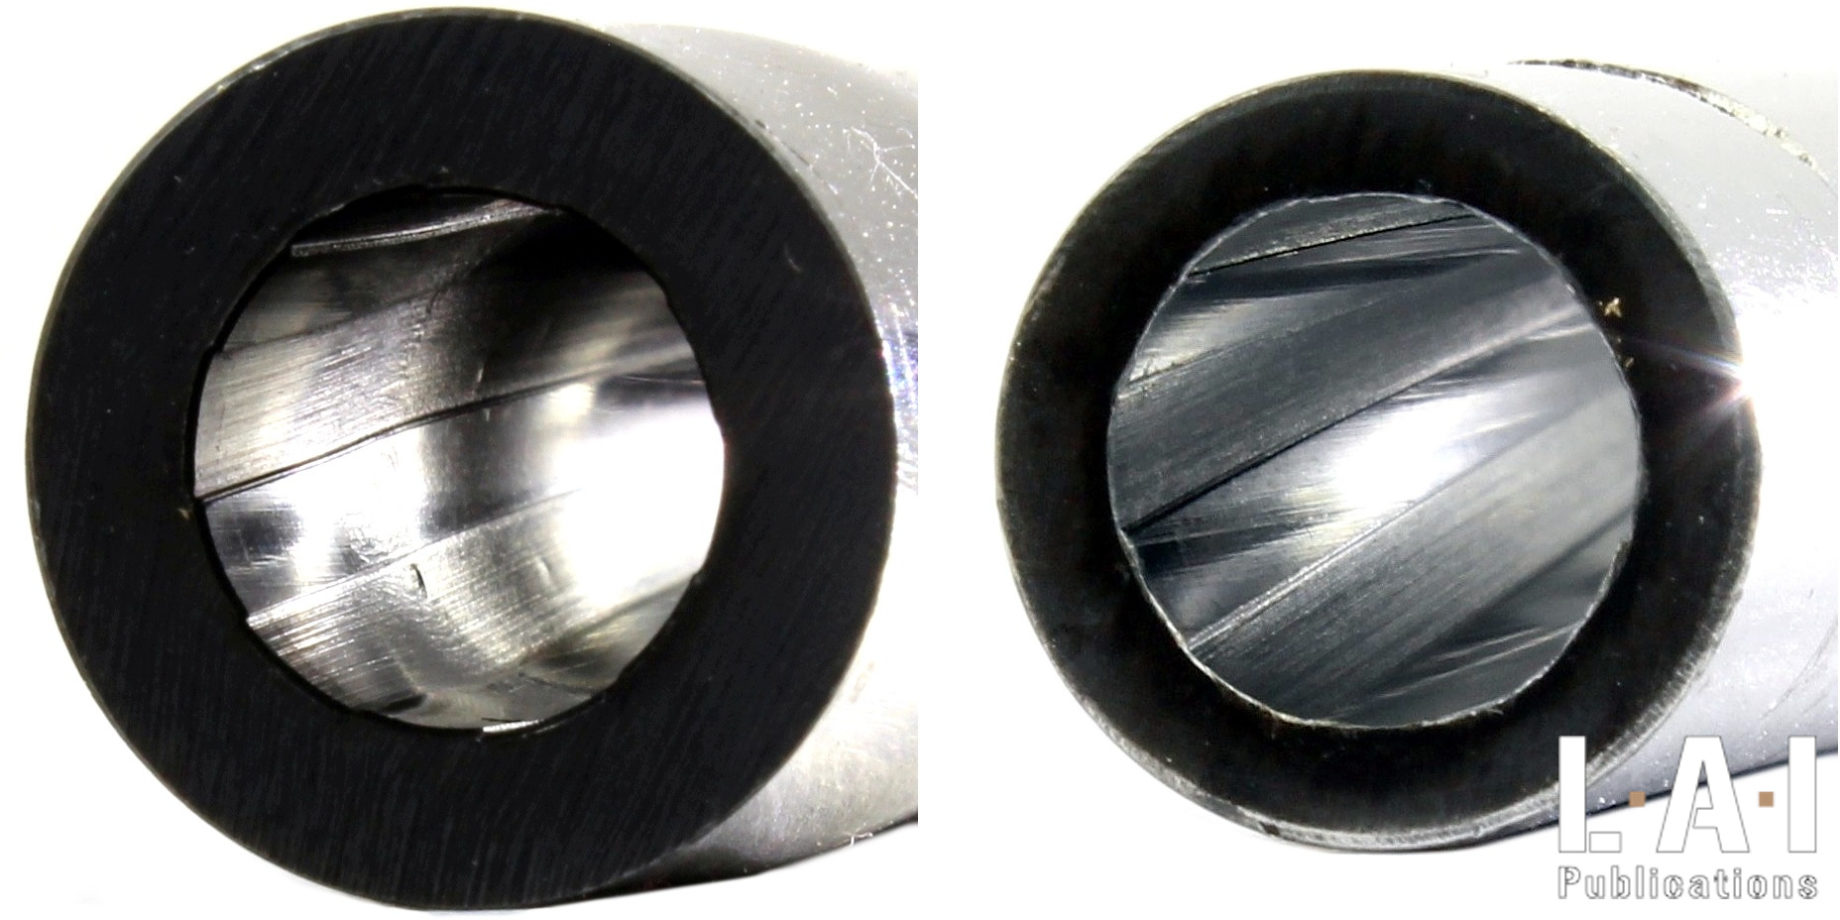
Pic.16: Various views taken at the optronic borescope: At the top, wear of the gas port. At the bottom, on the left anomaly (scratch), on the right trace of oxidation. Here, nothing really prohibits the shooting, neither in operation, nor in accuracy. The direction of fire is always from the left to the right.

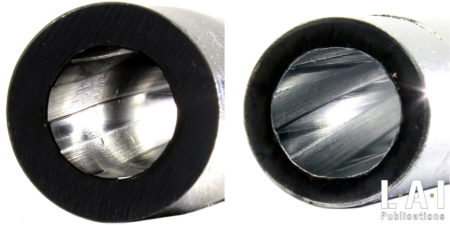
Pic.17: Polish made AKS-47 muzzle detail, which the rifling is strongly worn. Here, the chrome has peel-off on the groove edge, leaving the barrel metal exposed to wear and rust. If this flaw is not prohibitive for firing, it must be remembered that the accuracy would be impacted by this.
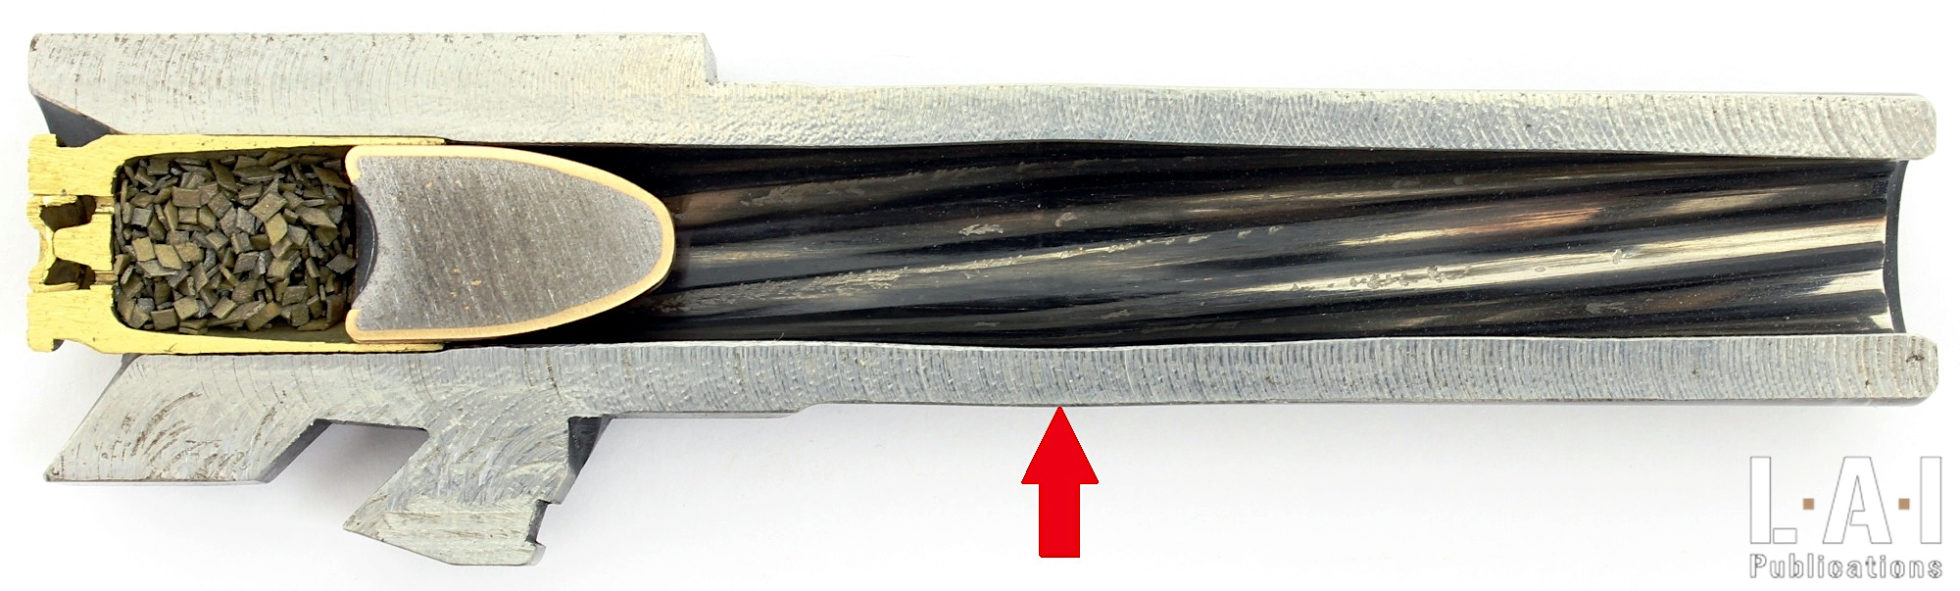
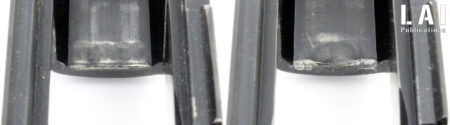
Pic.18: Cutaway view of a 9x19 Glock 17 barrel. This one, already presented in Chapter 4, shows a bulge in its central portion (see red arrow).
Pic.19: .44 Magnum barrel with a bulge: on the left, sawed-off near the bulge, on the right, the view of normal part of the barrel for comparison.

Pic.20: Detail of the erosion of the gas port of a G36 C barrel in section. The passage of the bullet is from left to right. At this stage of erosion, the rearmament pulse is diminished by this wear. The barrel is no longer compatible with operational use.

Pic.21: SP 2022 pistol slide which is cracked from each side of the ejection port. The appearance of cracks is consecutive to the firing of many cartridges: probably several thousand. It is difficult to draw up accounts that can reveal at what point a crack is likely to appear: this is specific to the ammunition fired and preventive maintenance (in particular the replacement of the recoil spring).
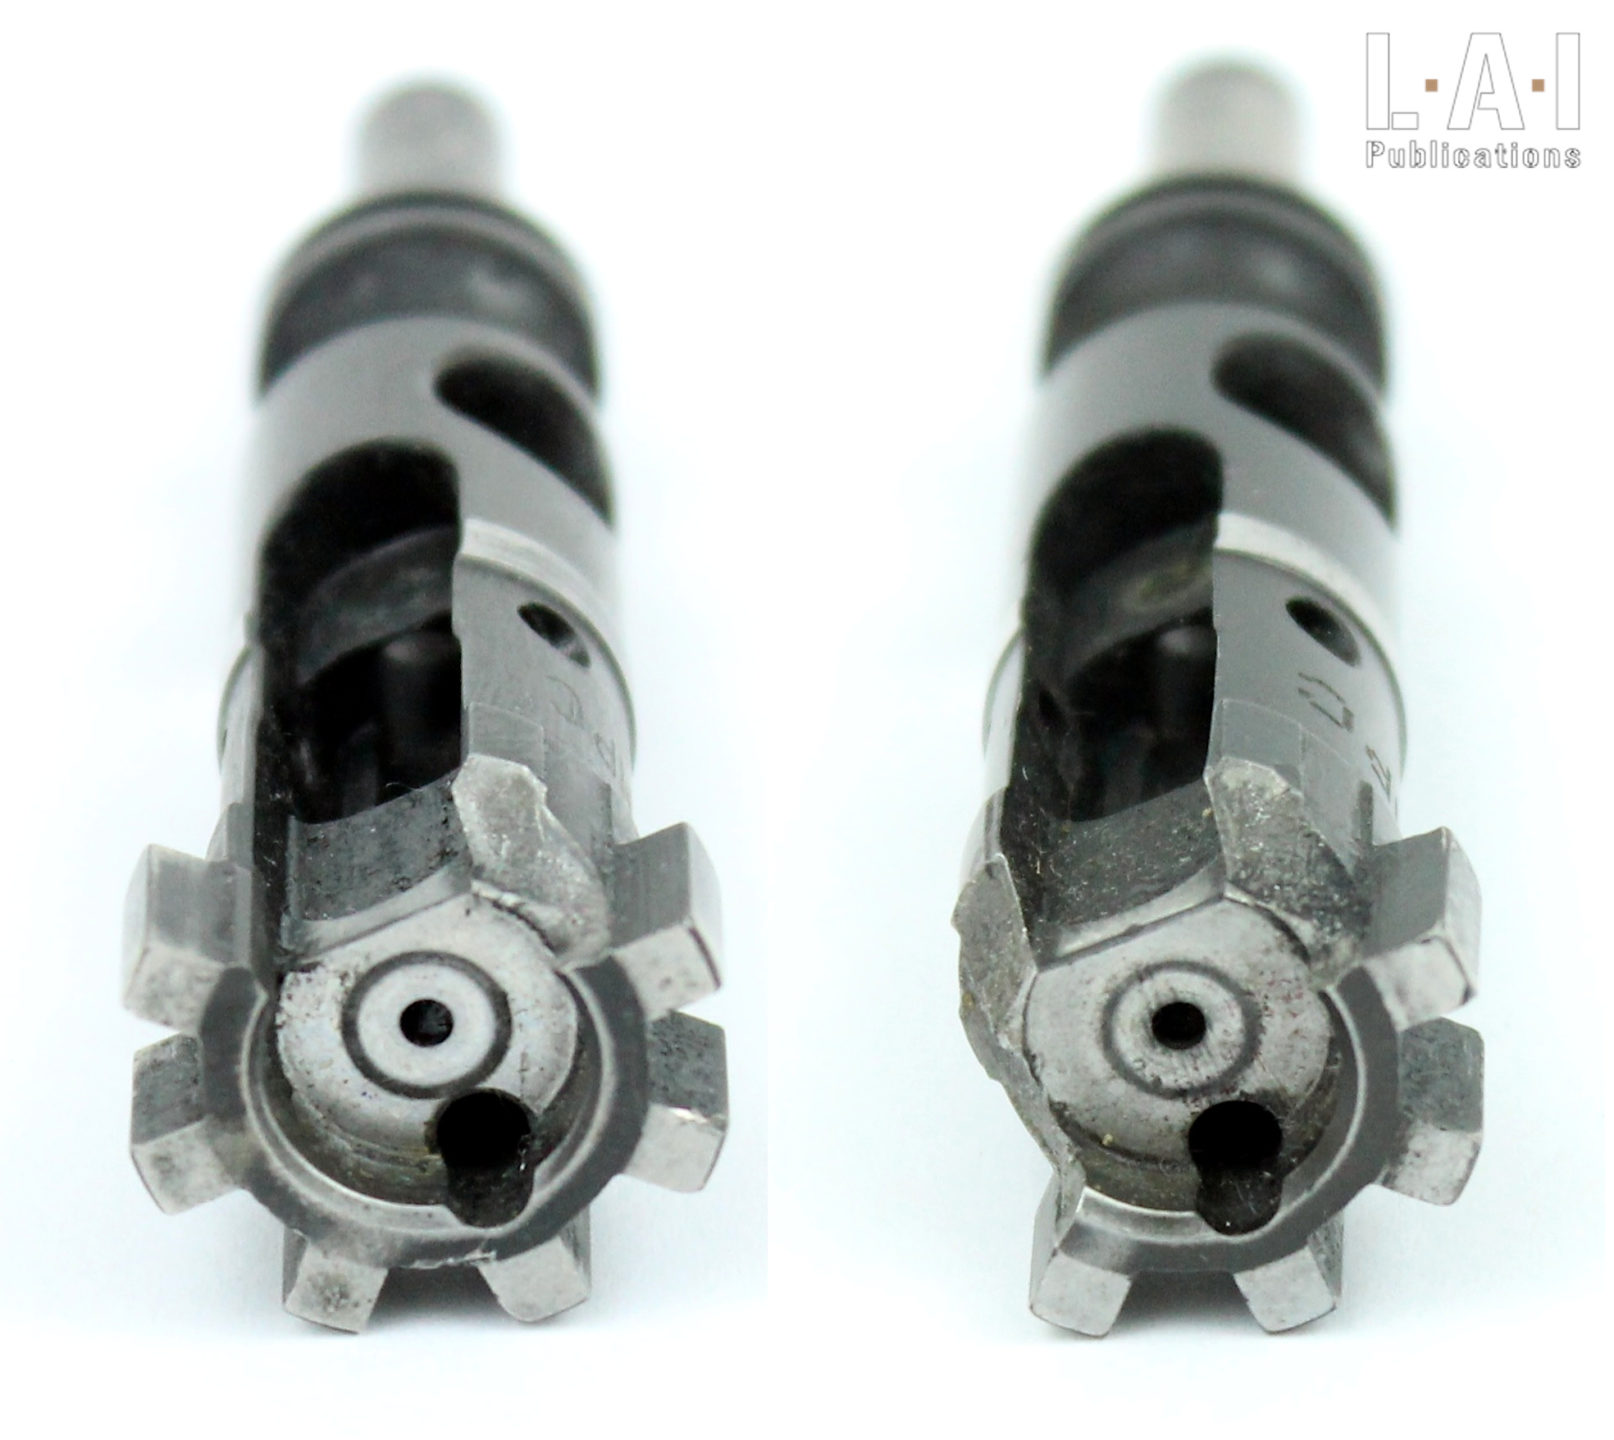
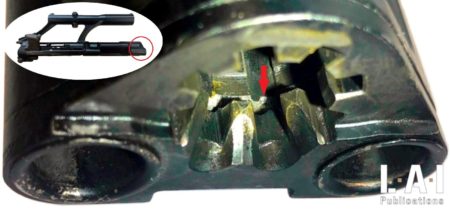
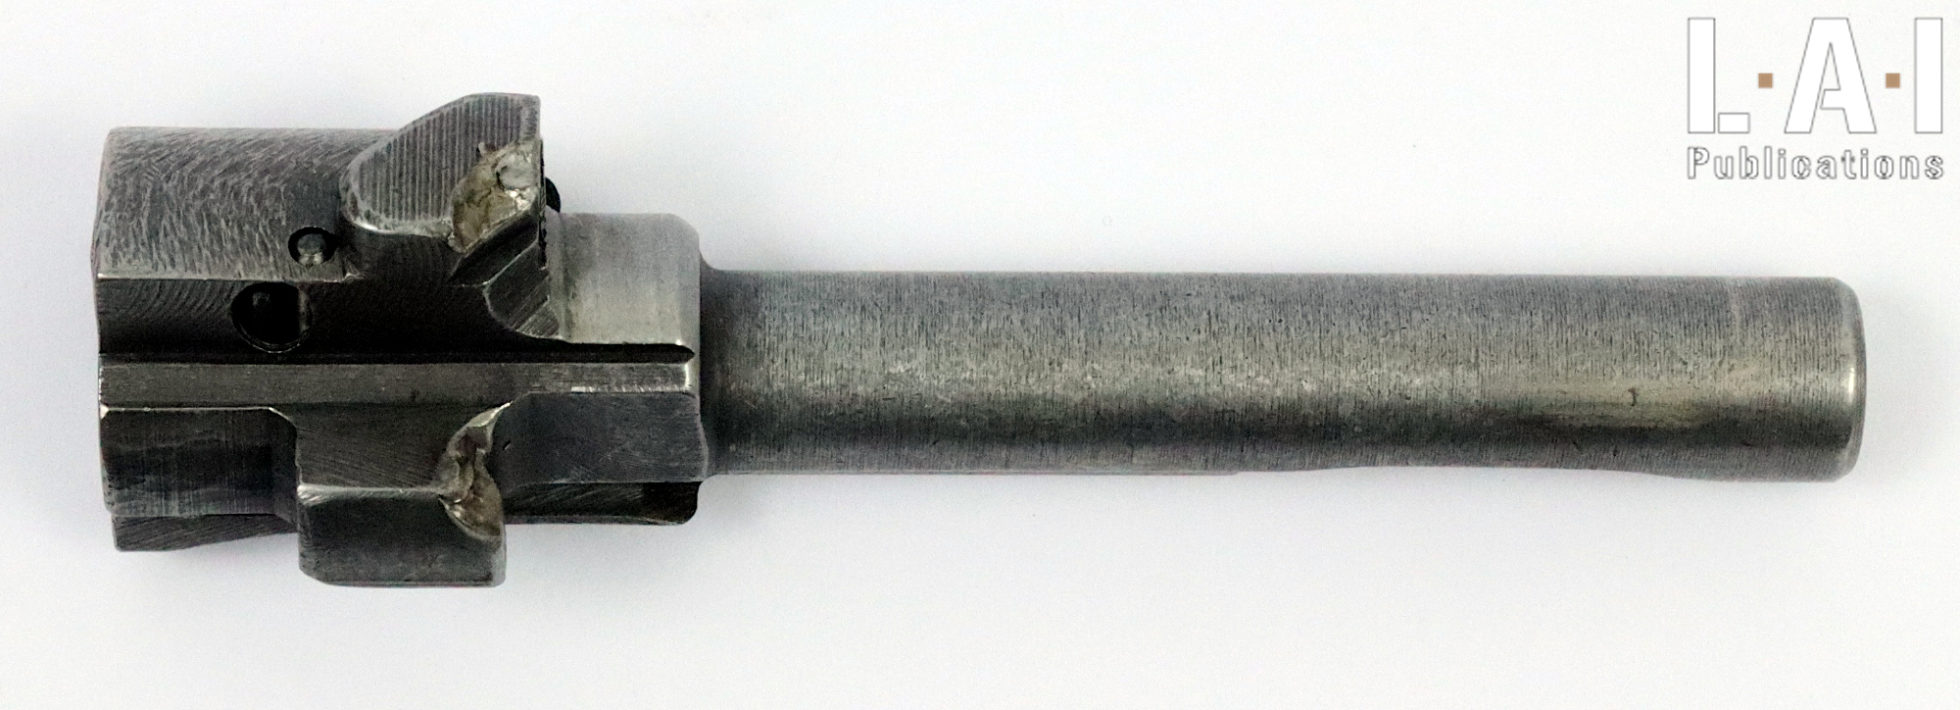
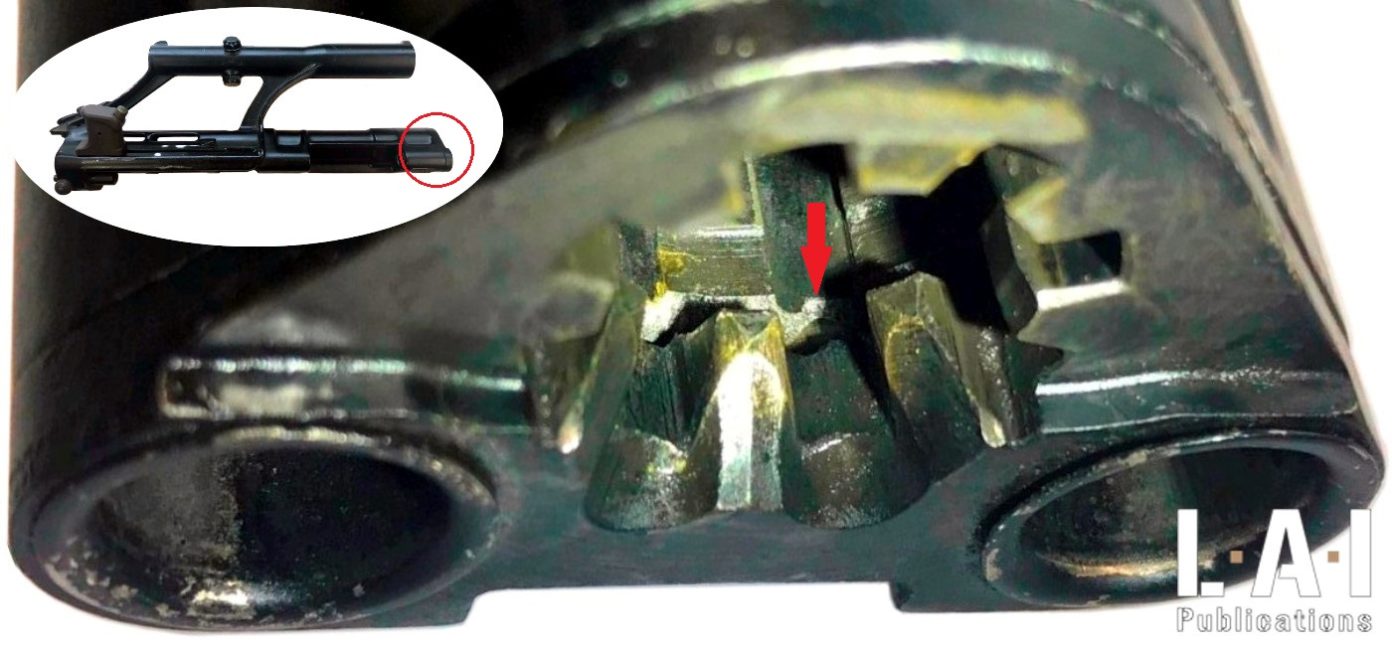
Pic.22: Colt 733 bolt (AR-15 type mechanical) with broken lugs on either side of the extractor groove. On the left, a single lug is missing, on the right it is missing 3. This type of rupture on AR-15 bolts is classic: the lugs implanted at the edge of the extractor are fragile by design. As mentioned in Chapter 5, the number of lugs does not in any way determine the strength of a bolt.
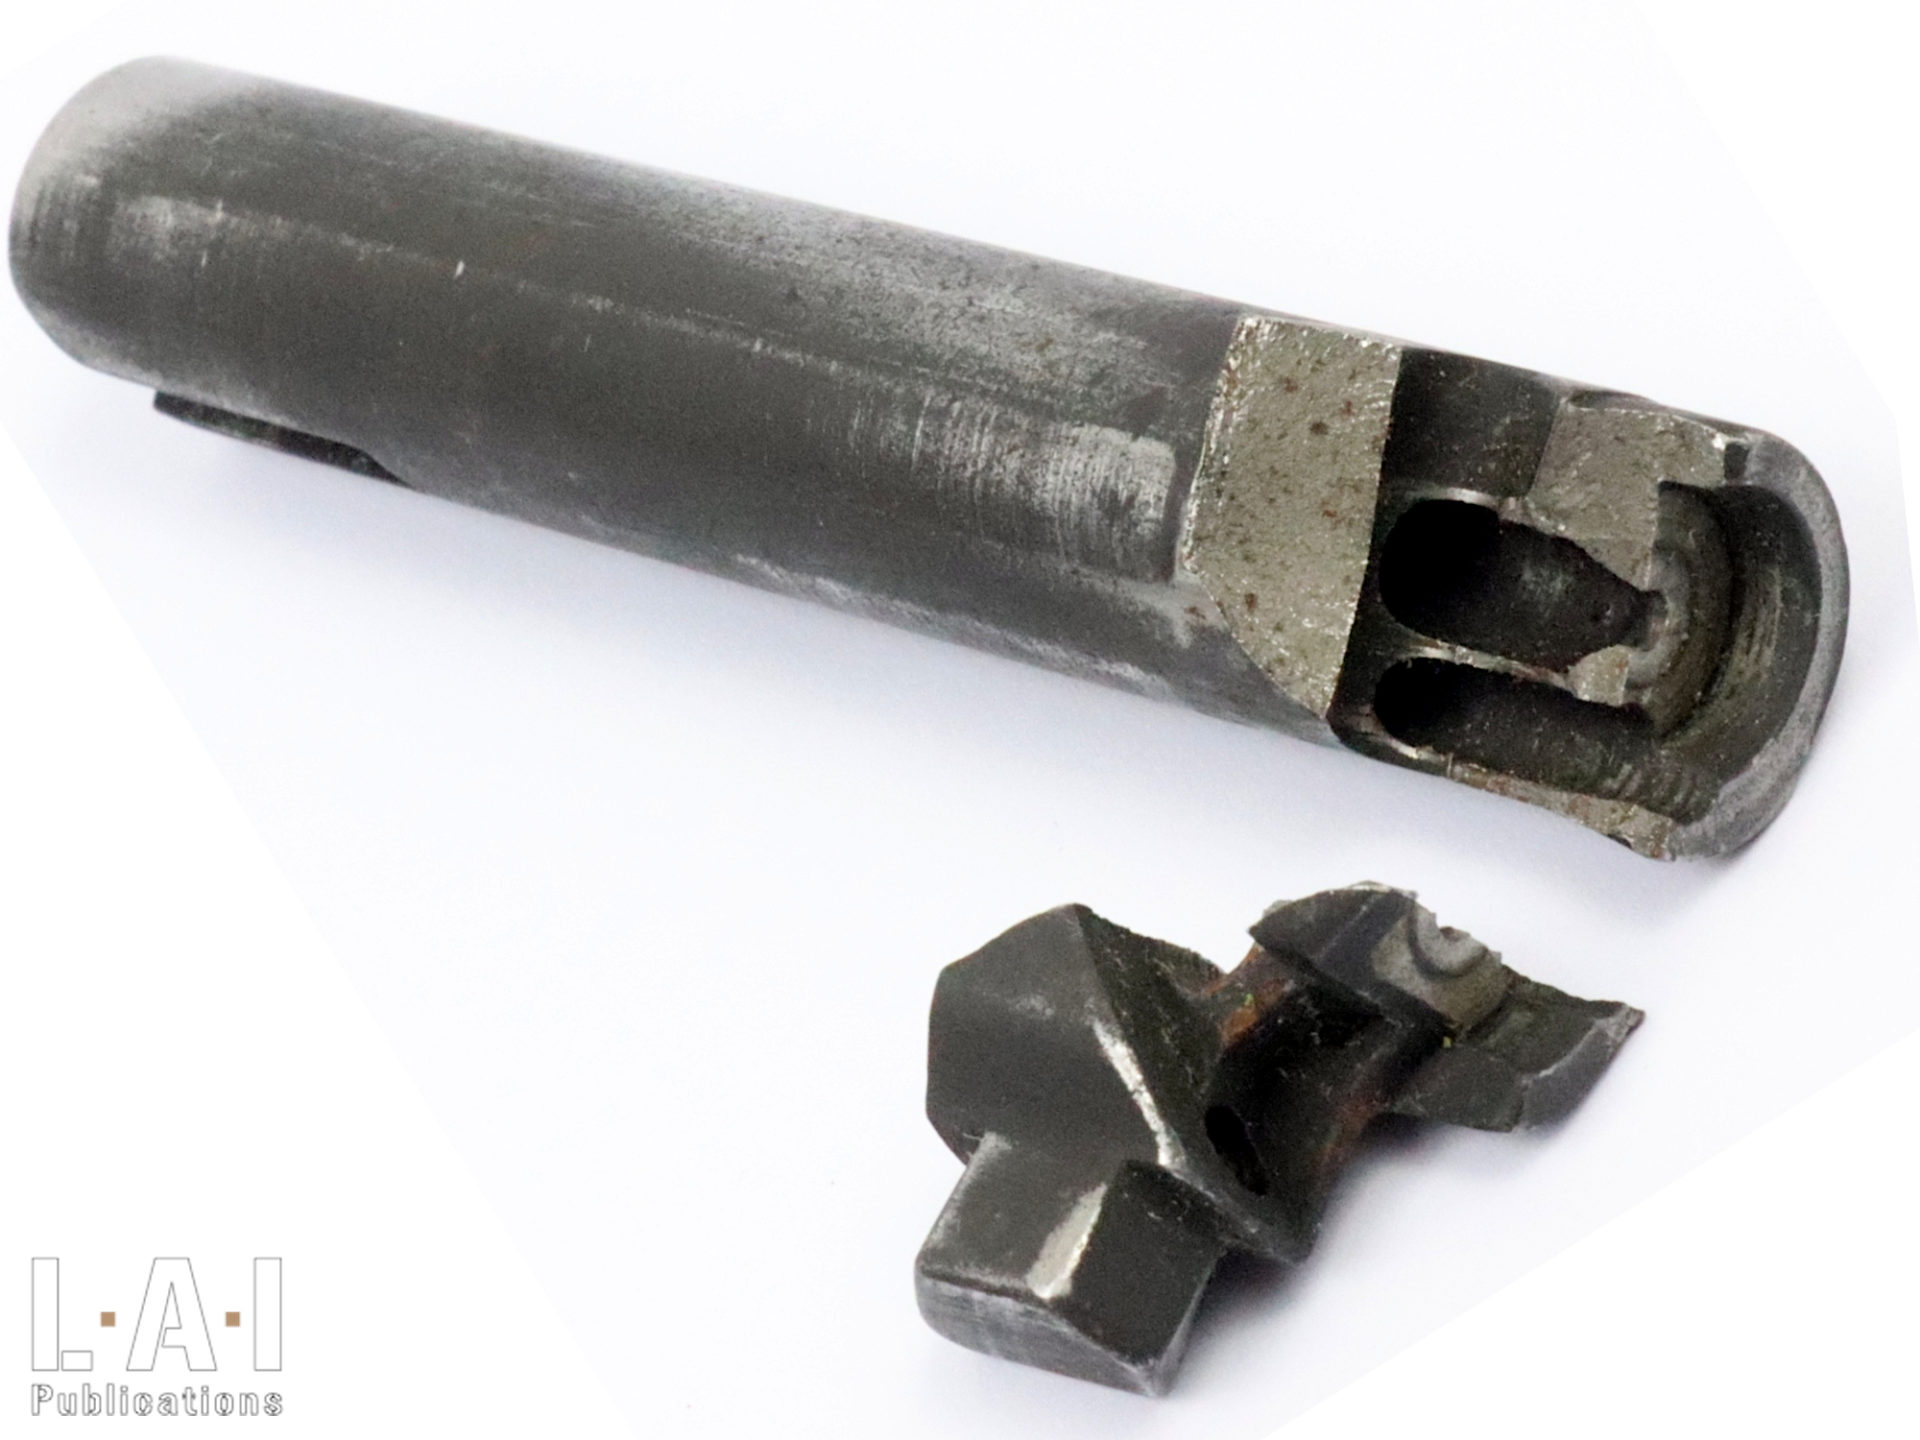
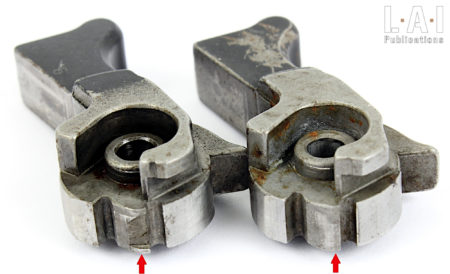
Pic.23: USM1 Carbine’s bolt whose right lug is broken. It is rather classical on this weapons family (M1 Garand, M14, USM1, Mini-14), the left lug being weakened by the implantation of the extractor.
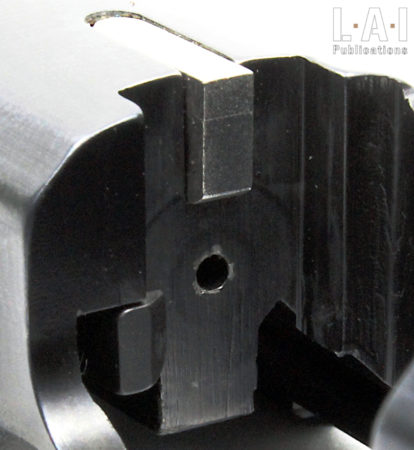
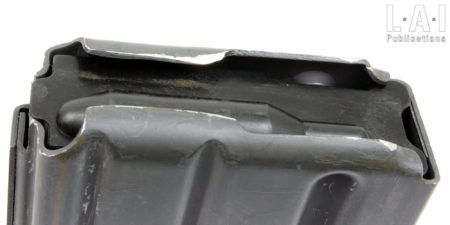
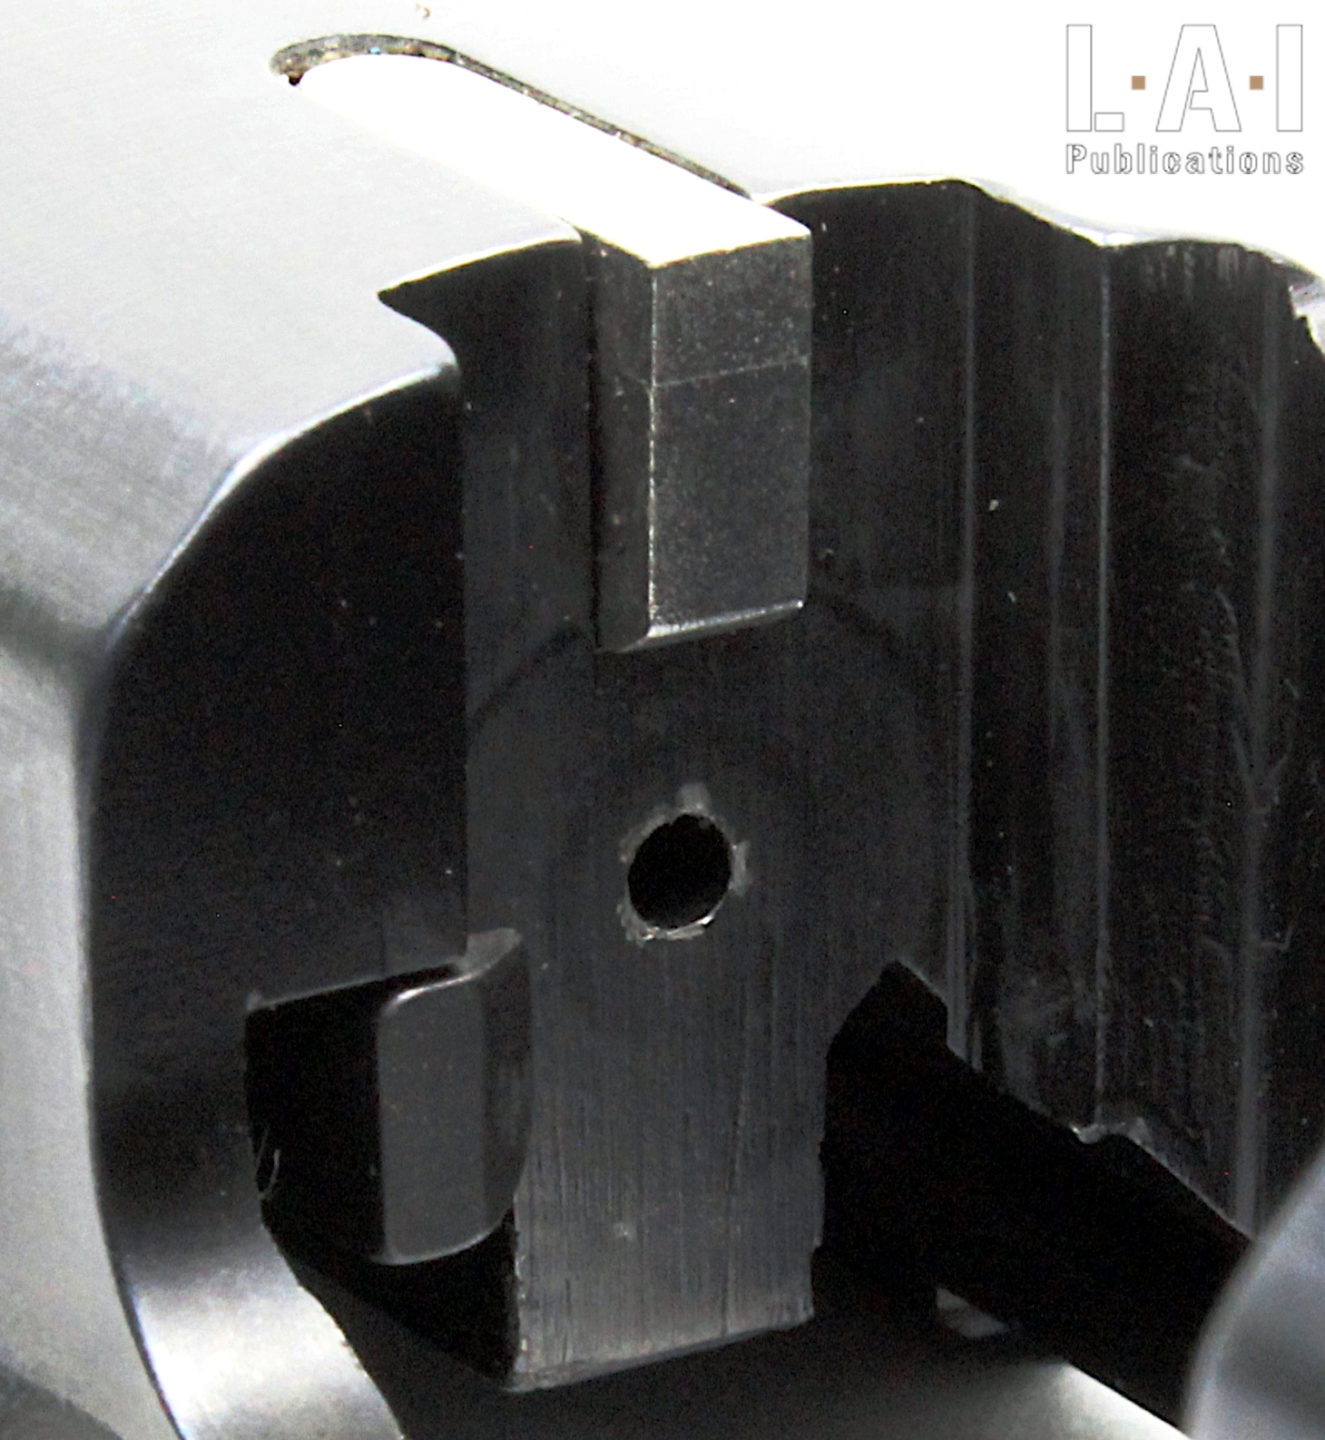
Pic.24: Locking area of the SP 2022 pistol. On the left, the area is in good condition. On the right, the area is no longer compatible with shooting: it is no longer flat strictly speaking. The use of a weapon that presents such a degradation will quickly lead to premature opening phenomena, which can quickly lead to stoppages, or even accidents.
Pic.25: Zastava M76 rifle’s bolt which bears absolutely abnormal crushings, probably linked to a production flaw.
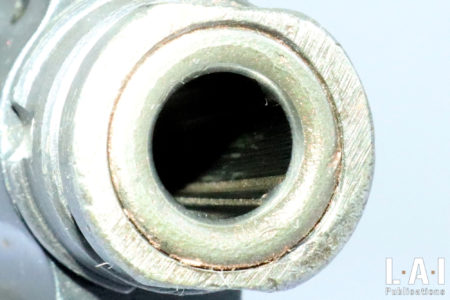
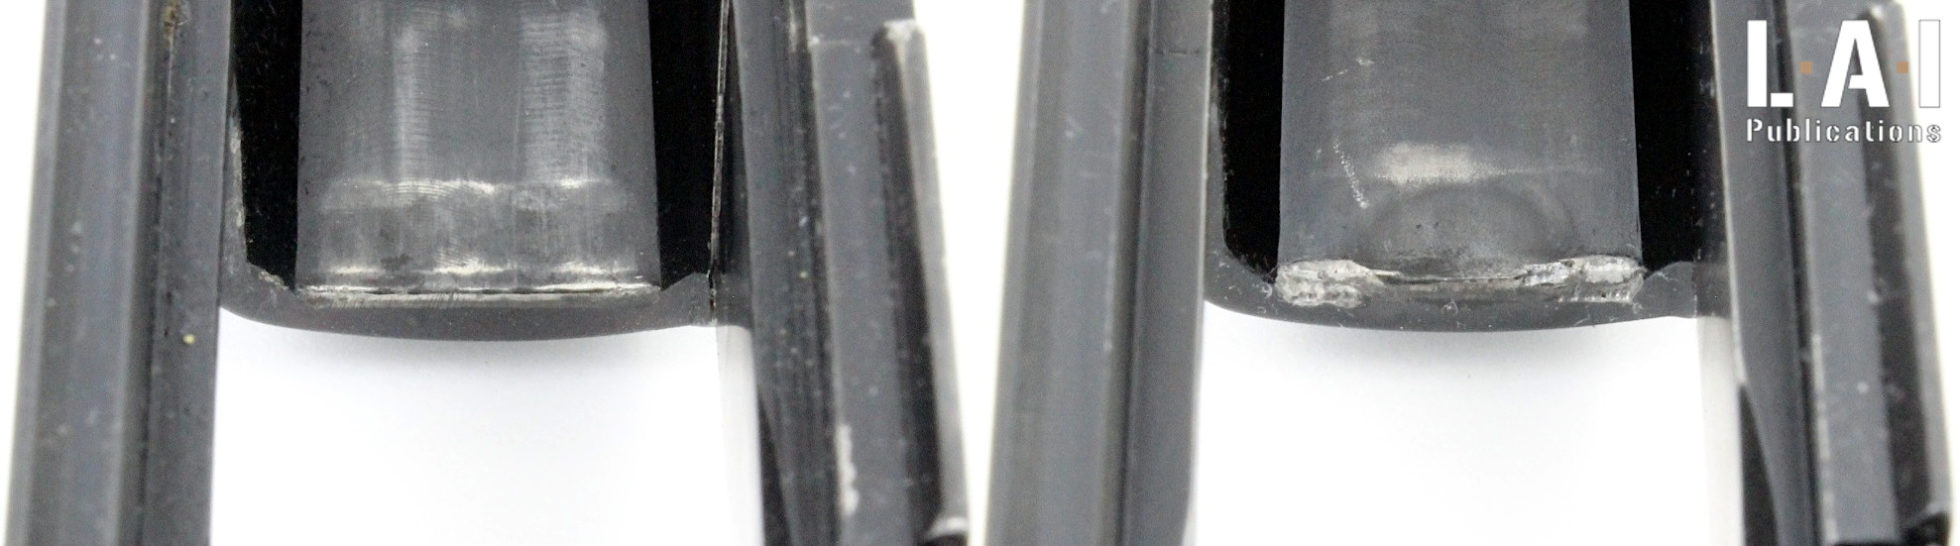
Pic.26 : Bolt face of the SP 2022 pistol. There is a peeling off the surface treatment (here carbonitride "QPQ") around the firing pin channel. Here, nothing incompatible with shooting.
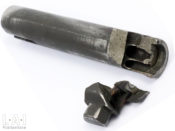
Pic.27: Broken Steyr AUG barrel extension.
Pic.28: AA-52 LMG (7.5x54 MAS) whose receiver is cracked on both sides. A "classic" wear for this weapon ... when it has far exceeded its initial life expectancy!
Pic.29: Glisenti M1910 pistol whose side plate (which must be considered here by extension as part of the frame) has seen the housing of the hammer axis become oval. This 9x19 caliber weapon was designed to fire the “9 mm Glisenti” ammunition, whose loading is weak compared to other ammunition of the “9x19” family. It is probably the use of bad ammunition which led to this deterioration.

Pic.30: Magazines for the 5.56x45 Wz-96 Beryl Polish assault rifle. These, made of transparent synthetic materials, split and end up breaking into pieces! We do not know if this is a defective series or if this problem is systematic on this manufacture. Magazines made of black synthetic material of the same manufacture give full satisfaction. It can be noted that these magazines retain the front steel insert of the Soviet AG-4 magazines, but neither the rear insert nor the lip reinforcement.
Pic.31: FAMAS magazine whose rear-left lip is bender and leads to intermittent stoppage.
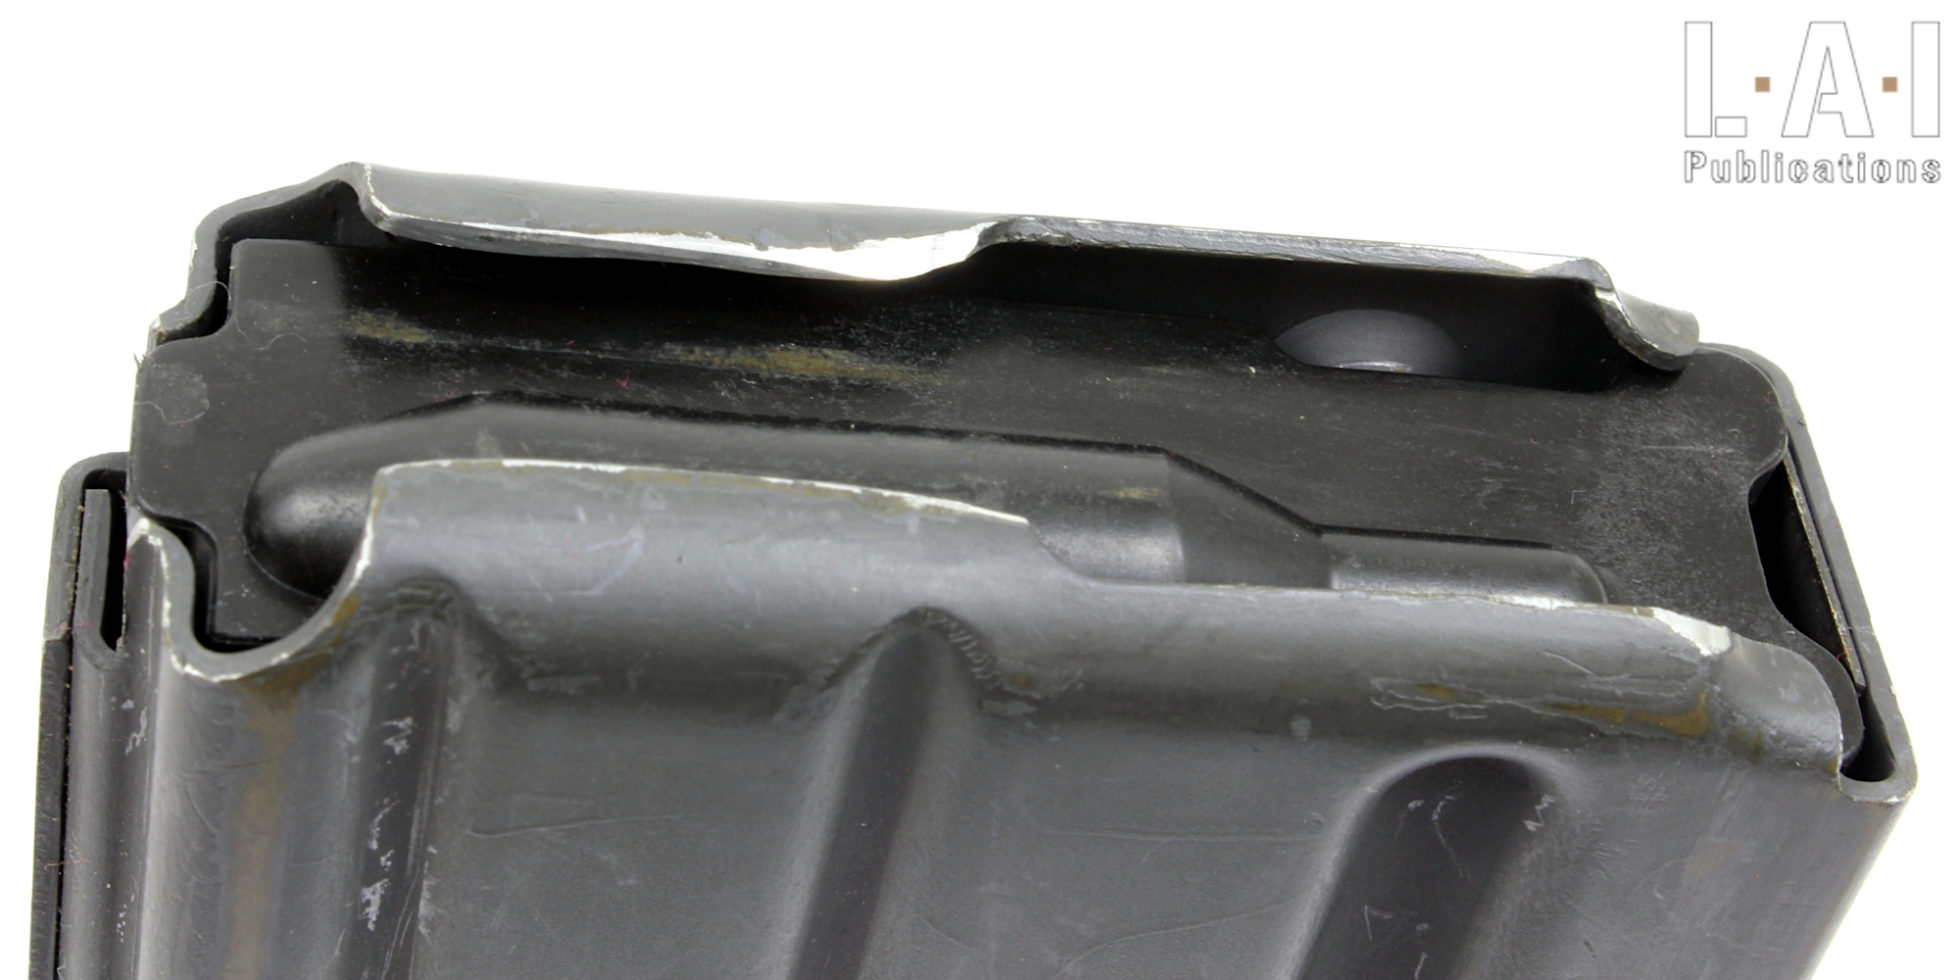
Pic.32: AR-15 type magazine whose left lip is bended and incompatible with its uses : the ammo are always driven down and jams the weapon.
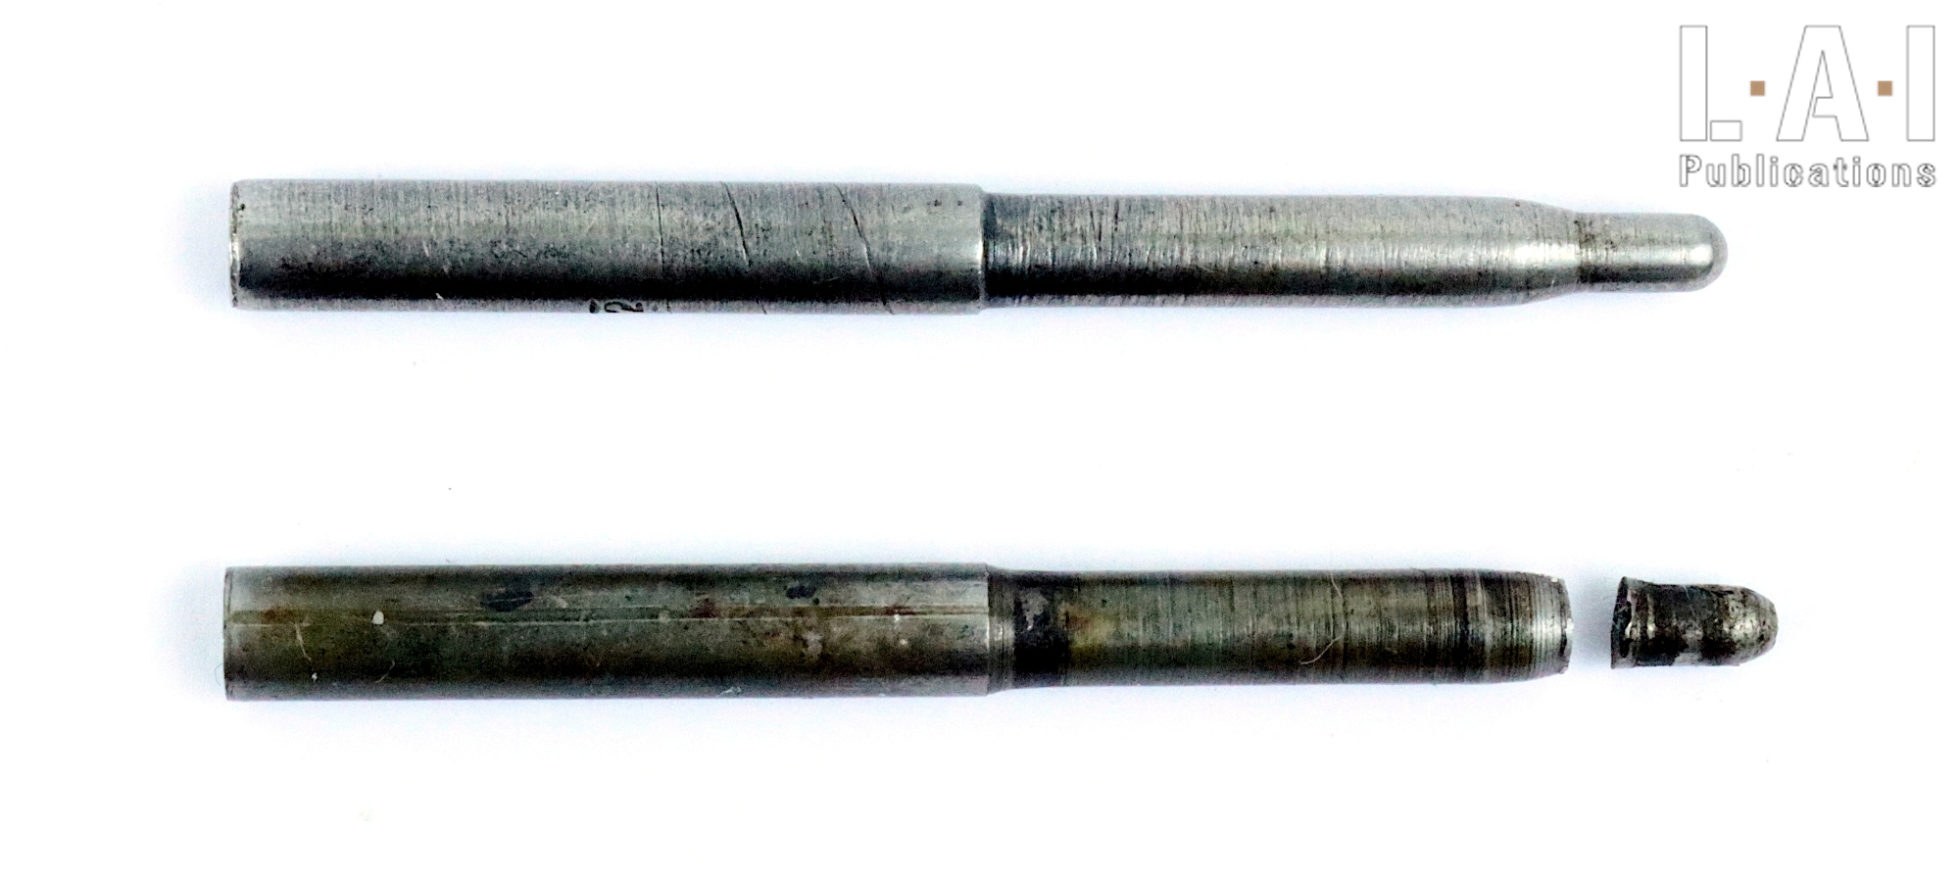
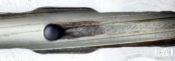
Pic.33: Bottom, a M53 firing pin (Yugoslavian MG 42) whose tip is broken. The breaking happened during a shooting session, but didn’t lead to any stoppage. The breaking was discovered during the cleaning session after shooting.
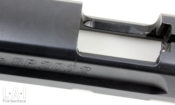
Pic.34: SP 2022 pistol hammer. On the right, the hammer's cocked notch was torn off. Here too, it is difficult to know the "mileage" of the part. However, this type of tearing is not surprising: we are in the presence of a complex part made of "MIM" and which has received a localized treatment to harden the notches. Also, rather than being subdued, the piece, very hard, is logically broken by the repetition of shocks. Once again, a weapon and its components have a lifespan.
Pic.35: STEN Mk.II SMG stock which bears cracks at its base.